Showing posts with label The Card Album. Show all posts

Wednesday, August 17, 2011

How to make a framed cartoon greeting card with a Cricut Fancy Frame Die cut

Do you have a stash of little things cut from magazines and newspapers like I do? If you you do then why not use them to make greeting cards? The Cricut Fancy Frames Cartridge is the perfect cartridge to have in your craft arsenal to make all those recycled bits into framed art! (Want to win one? Pop on Over to Craft Gossip and leave a comment by August 25th, 2011 to get yourself in the running for a Cricut Fancy Frames Cartridge.)
Here is how I made my framed recycled cartoon greeting card:
I cut out one of the pretty frames from the Cricut Fancy Frames Cartridge.
To make the card I held the frame onto a piece of scrapbook cardstock and scored it.
Next I folded the cardstock in half on the scoreline and cut the card width. All that was left to do was trim the bottom flush to the top flap. I like cutting my cards after I make my top element as opposed to starting with a card and then embellishing it. I'm just crafty like that.
I felt the frame needed a little texture and color in the form of some Plaid paint and glitter to coordinate with the off-white of the cartoon paper and the blue glitter of my background cardstock.
Well, then I just went ahead and changed my mind and thought it ended up "blending" too much and I picked out another cardstock that contrasted a bit more.

If you can't read the cartoon it is one snowman telling another wearing a pair of way-long plaid pants, "They fit around the waist nicely, but you may want to hem them up a bit."

Wednesday, June 22, 2011

Computer Keys are the shape of most of my days it feels like

Today's ATC and card are inspired by the book Inner Excavation: Exploring Your Self Through Photography, Poetry and Mixed Media. One of the questions that is posed to help a creator make art is " What are the shapes of your day?"
Well, I feel like the computer keys on my desk are often the shapes that I spend the most time with. So they became my starting off point.
These are two additional keys I have added to my keyboard. The other main objective some days is to "find" things. If it were only as easy as hitting a key to make it happen.....
I have a book of clip art images that I love to use in my art and cards and funny enough there was an image of computer keys. Another element that is one of my favorites to include is a translation dictionary bit. I used a Spanish dictionary and the word "find".

Lastly I had this great picture of Brigitte Bardot looking like she is looking for something. Well there is the starting off point from Inner Excavation and where it took me. I look forward to trying more of the explorations in Inner Excavation.

More about the book from North Light Books:
Inner Excavation:
Exploring Your Self Through Photography, Poetry and Mixed Media


by

Liz Lamoreux

This book will guide you through the expressions of photography, poetry/journaling and mixed-media as they pertain to exploring how we not only currently see ourselves, but how we can learn to see new things hiding below the surface. Each of these sub-topics features a different contributing artist (or the author) and includes tips, prompts, meditations and other exercises, along with plenty of full color inspiration.

Liz Lamoreux is an editor, poet, photographer, yoga teacher and mixed-media artist living in the Pacific Northwest. She is the organizer of the Be Present Retreats where she teaches alongside nationally known instructors. She has been writing on her blog, Be Present, Be Here, for five years and has quite a following.

Wednesday, May 4, 2011

I love my Mom from head to "Toe" Mother's Day card

Yup, the woman who crafted me and had to put up with me at my craziest cutting up moments is to be honored with these absolutely silly socks. My Mom is waaaaaay conservative so there are for sure over the top, but I felt the sentiment was true.

At first I was just going to pop them in an envelope but then I decided to make the card a little more special.

I die cut a few letters "texting" style and taped the socks in with removable poster double sided tape. (I love how the packaging matched the card)
And what Mom doesn't have a stash of handmade cards? Why not get her a special place that she can slide them in without damaging them and flip through them like a book? Sound like a plan? Then score yourself a Card Album!
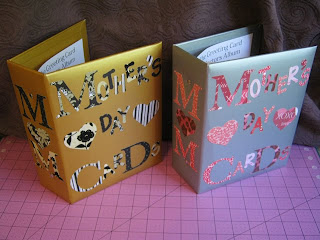
Here are a few Card Albums that I decorated with the words "Mother's Day Cards" on the front and the word "Mom" with the "o" being a heart die cut on the spine that would show when the Card Album was on a book case.

Thursday, April 14, 2011

How to make a stitched broken heart card

Today I have this mixed-media card project to share with you using a stitching idea from the book Flavor for Mixed Media: A Feast of Techniques for Texture, Color and Layers.
I like using the broken heart as a theme. They are super easy to make. I ran a pretty piece of paper through the Sizzix die cutter and then just sniped the heart in half in a zig zag line.

This page from Flavor for Mixed Media: A Feast of Techniques for Texture, Color and Layers was my inspiration to stitch back up my broken heart. It features words and art by Tonia Davenport.
I glued the heart down to the card and poked holes on each side of the zig zag with the needle. I then stitched it back up with a piece of silver Kreinik thread.

I thought it came out looking pretty cool from the back side too!

If you are like me and like compilation books filled with art, techniques and inspiration from a variety of artists then I bet you will like:
Flavor for Mixed Media: A Feast of Techniques for Texture, Color and Layers
by
Mary Beth Shaw

Creative individuals are typically as passionate about food as they are making art. So while this is a mixed-media technique book, there are underlying analogies of cooking. A dinner-party setting has a guest list featuring contributing artists. You will be introduced to five chapters, or "courses": Color, Layers, Texture, Flavor and Combinations. Each chapter features projects with stepped-out techniques pertaining to that chapter, as well as tabletalk (inspiring insights and constructive tips) from the guests, and sidebars (What?s in Your Pantry) for ideas such as using found objects, painting over ?failed? works and stimulating your brain when you?re out of ideas. Techniques for the projects will show you how to do things like develop layers with stencils, create texture with items like a cheese grater or combine different substrates into one project.

Mary Beth Shaw has been exhibiting in galleries and art shows across the country since 2000. Her mixed-media works incorporate acrylics, pastel, ink, maker and various collage materials. Her pieces have been published in Cloth Paper Scissors as well as in Creative Awakenings by Sheri Gaynor (North Light Books, 2009). Her teaching style and classes have been very well received on the art-retreat teaching circuit.

Wednesday, March 30, 2011

How to make a dotted line and recycled newpaper greeting card

This is my #6 card in my 365 Greeting card project that I am posting over at The Card Album blog but I thought I'd share the tutorial with you here. I used a technique from the book
Mixed-Media Paint Box: Weekly Projects for a Year of Creative Exploration.
You don't tend to think of your sewing supplies as painting tools but that's what Giuseppina "Josie" Cirincione did by coming up with the idea for using a tracing wheel to paint dotted lines.
I grabbed a piece of pink card stock and tried out this fun way to paint dotted lines.
Now that I had this cool dotted line paper it was time to make it into a greeting card.
I had this page from the newspaper that had some cool illustrations by Katherine Streeter and I picked one to incorporate onto my card and off to one of my favorite sources for quotes, One Up Me, and I picked "She's like bell-bottoms, had a fit over boots."

Pop on over to The Card Album blog to see some of my other cards, mostly made out of something recycled and make something too!

More about the book:
Mixed-Media Paint Box: Weekly Projects for a Year of Creative Exploration
By
The Editors of North Light Books

Play With Paint All Year Long!

Incorporating paint into your mixed-media art has never been easier or more fun. Open up your paint box and delve into a year of creative ideas from 45 of your favorite artists. Whether you’ve used paint for years or have been anxious to try a new medium, you’ll find great advice and ideas inside Mixed-Media Paint Box. Each week, you’ll be guided with step-by-step instructions through a different project or technique that will add instant depth and drama to your art!

Inside you’ll find:

+ 52 projects and techniques, one for every week of the year, to inspire a weekly dose of creativity.

+ Tips, hints and suggestions from some of your favorite authors, including Ruth Rae, Claudine Hellmuth, Chrissie Grace, Bernie Berlin and Margot Potter.

+ Step-by-step instructions for jewelry-making, assemblage, journaling, collage and a variety of painting techniques to incorporate into your own art.

Discover inspiration and new ways to express yourself every week inside Mixed-Media Paint Box!

Tuesday, February 23, 2010

Mixed Media Greeting Card Album using embellishment ideas from the book The Scrapbook Embellishment Handbook by Sherry Steveson

First let me say mixed media crafting makes a mess! A fabulously fun one, but none the less a big a** mess.

I love working with all sorts of bits and pieces so the book The Scrapbook Embellishment Handbook was right up my alley being that it is divided up by chapter based on each type of embellishment....very cool!

The first embellishment that caught my eye was the little metal frame on this page in the "Metal" chapter.
I save tin cans to recycle into die cut elements and so it was easy to run a piece of soda can through the Sizzix die cutter with the slide/frame die.
I have a stash of old family slides and it's cool that they fit perfectly in the Inkssentials Memory Frames by Ranger.
But I think they would look better hanging being back lit so I then when to my stash of scrapbook paper catalogs which happen to be a great source of little images and backgrounds. I also poked through an old catalog of stock photography. Out of these two I filled my little frame.
I punched two tiny wings from the McGill punch and textured them. I assembled these elements along with a tag that said "wander" which I thought went great with the road image and shoes with a bit of wire.

For the background I cut a piece of woven plaid fabric and fringed the edge by pulling a few of the threads out from each side and glued it onto the cover of The Greeting Card Album.

I put an image into the soda can die cut frame.
Printed out the words "knot nice" with my label maker.
Glued it all onto the plaid cover with a sawed off end of a spent 12 gauge shotgun shell casing.

Kind of eclectic but so am I!

Want more fabulously fun ideas on how to use embellishments? Grab a copy of:
The Scrapbook Embellishment Handbook
By
Sherry Steveson

Product Description from the publisher Memory Makers Books:

"The Scrapbook Embellishment Handbook, author Sherry Steveson covers 17 popular types of embellishments and teaches you how to utilize them on your layouts. With beginner, intermediate and advanced techniques for each embellishment, you will get over 50 step-by-step demonstrations, plus 130+ layouts and projects that illustrate these techniques.

A bonus Step It Up gallery shows you how adding embellishments can enhance a layout. In the gallery, you will see how a layout starts with a simple design, then is passed to a second scrapbooker who adds a few embellishments and finally it is passed to a third scrapper who adds even more embellishments, completing the look.


About the Author
Sherry Steveson has been scrapbooking for nearly nine years, and her work has been featured in Creating Keepsakes, Scrapbook Trends, Simple Scrapbooks, Scrapbooks, Etc. and Memory Makers Magazine. She is a design team member for several kit clubs, a manufacturer, and an online store. She is also the author of When Life Gives You Lemons."

Thursday, January 14, 2010

Sweater Surgery flowers as rings on gloves Inspired by a project from the eco-friendly book Refashioned Bags

Do you like to have a "hand" in your accessories?

I am sure you know by now I love to:

A. Repurpose everything
B. Customize and personalize everything

So that is what I did!

I took this great project from the book Refashioned Bags and personalized it Sweater Surgery style and instead of just adding a button I kicked it up a notch and in addition to the button I added some die cut flowers made from recycled wool felted sweaters.
----------------------------------------------------------

Will you be at The Craft Super Show or the trade show that follows, CHA in Anaheim, CA
Jan 21-27th?

Than you can have some fun with me!

I will be teaching the classes:

-Customize your Greeting Card Album from 3-5 on Sat 23rd

This is part of the new retail show and that means anyone can come!

-Make a Recycled Sweater Bird necklace from 12-2 Monday the 25th

Room # 212B

This is the trade show so you have to be a member of the trade to attend.

-Doing a book signing of my book, Sweater Surgery in the Barnes & Noble 10-11 on Tuesday 26th
And

A Make & Take of these super cute button and sweater flowers with a book signing of Sweater Surgery in my Publisher's booth #2144
from 3-5PM also on Tuesday 26th


I look forward to seeing any and all of you there at any of these great classes and activities!

--------------------------------------------------

Hey and if you need more info about the super cool book:

Refashioned Bags: Upcycle Anything into High-Style Handbags

By
Faith Blakeney and Justina Blakeney

From the Publisher, Potter Craft:

"Reduce, Reuse, Refashion! Handbags are the ultimate accessory. Fortunately, you don't need a cookie-cutter designer bag to make a fashion statement. In today's greener, more fiscally responsible world, it makes a lot more sense–and is a lot more fun—to make your own. Whether your closet is already an amalgam of hand-made clothing and remastered mash-ups or you're diving into DIY for the very first time, bags are one of the easiest accessories to make over and require little more than a needle, thread, and everyday items you can find in the closet, garage, attic, or flea market. That's why the authors of 99 Ways to Cut, Sew, Trim & Tie Your T-Shirt into Something Special show you how to make boutique-ready bags on the cheap. The Blakeney sisters twist and weave, turn inside-out, and reappropriate just about anything and everything to fashion radical accessories with mad style and a message.

In
Refashioned Bags, you'll learn how to create carryalls, clutches, laptop bags, totes, and more. And all of them will get a unique look, whether from the use of an old wool sweater, an ex-boyfriend's neckties, extra shower curtains, dad's hand-me-down suit jacket, a quilt, an umbrella, or even a bath mat. Some of the inventive and one-of-a-kind bags you'll learn to make include:

• Boho Hobo Bag
• Sweater Computer Cozy
• Dapper Diaper Bag
• Dolce Doily Purse
• Le Zip Sac
• Tux Redux Bag And more!


Helpful diagrams accompany the step-by-step instructions, along with bonus crafting ideas, fun facts, and tips and tricks from top bag designers in the DIY field who work with, at times, unusual materials. By following just a few easy steps that require little more than cutting, folding, gluing, and basic stitching, you'll be able to add refashioned bag designer to your repertoire.
"

Monday, July 13, 2009

The Card Album in The Judikins Booth at The Carson Rubber Stamp Show and Crafty Blogger Links

This is the Judikins booth at this past weekend's Carson Rubber Stamp Show. As you can see I couldn't get very close because of the crowd watching all the cool techniques that Cherryl Greene was demonstrating!Not only was Cherryl teaching cool techniques, Judi, yes one in the same of Judikins was also sharing cool stuff you can do with all their great new products. One of which is the Card Album, as seen below. Not the best picture but hey it is such an exciting event, picture taking was a little crazed!
OK, that's the stamping and shopping news of the weekend here is the crafting news from my fellow Crafty Bloggers:

Vickie Howell-Craft.Rock.Love
Vickie's 10 Craft Tips for Busy Parents!

The Impatient Crafter
Madge shares the 411 on how she made a gorgeous crystal, rubber and exposed wire collar inspired by African jewelry.

The Crochet Dude
See a sneak peek video of Drew's new pattern line that launches August 1st!

The Artful Crafter
If you’re a polymer clay beginner or just want a quick professional looking project, use molds!

Craftside-A behind-the-scenes peek at a crafty world
This week at Craftside there is the latest episode of Look, Learn & Create featuring the fabulous cloth doll artist, Patti Medaris Culea, a fun vegan recipe for Frushi (fruit sushi), a how-to on making a tennis ball training tool, and an Illustrator tutorial to make a digital word ATC and as always a bunch of questions that if you answer you are entered to win a free book!

Mixed Media Artist
Do not fear...making altered books will not cause lightning to strike you!

Cross Stitch at About.com
What do you do with odds and ends of embroidery floss? Read these ideas and share your own.

Crafty Princess Diaries
Have you thought of starting your own craft weblog? Here is why crafting rocks when it comes to niche blogging.

Cathie Filian
When you need a crafty break - whip up this quick and easy snack of homemade hummus and baked bagel chips.

Aileen's Musings
Aileen gives you a sneek peek at some felt banners she's making for a swap, and tells you how to make easy rolled felt flowers to use as embellishments.

About Family Crafts
As a parent, one of the biggest crafting dilemmas you may face is what to do with all the wonderful masterpieces your child creates. How do you display each piece so it gets the attention it deserves?


Bookmark and Share

Monday, July 6, 2009

Win a Card Album at Scrapbooking.com and Crafty Blogger Links

Click here to take the Scrapbooking.com survey and you are entered to win a Free Card Album! The only album specifically designed to bind and store your cherished greeting cards. Or you can buy them over here if you need one right now!
And of course it's Monday so I have Crafty Blogger links for ya!

About Family Crafts
If you are looking for a creative way to celebrate every day during the month of July, check out this special events calendar!

Aileen's Musings
Ever wonder how to get that cute copyright symbol or better yet, how to put one on your artwork or photographs? Aileen offers a easy tutorial using PSP.

Cathie Filian
It is summer and that means beach & pool time! Visit Cathie Filian's blog to learn how to stitch up a terry beach throw.

Crafty Princess Diaries
Tammy shows off her cool new sewing cabinet that was surprisingly inexpensive.

Cross Stitch at About.com
Why no knots in Counted Cross Stitch? Find out why and how to secure your floss in alternate ways.

Mixed Media Artist
Cyndi reports on her experiences with using the new CopprClay. This stuff rocks!

Naughty Secretary Club
Thinking about starting up your own craft business? Jen has a few suggestions of things you might consider first. Plus learn how you can take a Crafty Business Seminar with Jen from anywhere in the world!

Craftside-A behind-the-scenes peek at a crafty world
At Craftside there is a bling-tastic video on hand lettering with Lisa Engelbrecht, from the new book The Crafter's Devotional a how to make a leather book cover and flag cuffs made from a book cover, an "actual size" silver heart using PMC, and a fun snack recipe.

The Artful Crafter
Eileen suggests you go shopping for craft supplies in your jewelry box and closet. Make an old accessory into something new and fresh.

The Impatient Crafter
Madge shares the clip from her recent appearance on Lifetime TV's The Balancing Act for Beadalon.

Vickie Howell-Craft.Rock.Love
Learn how to finger knit with Vickie's step-by-step how-to, featured on the CRAFT website!


Bookmark and Share

Tuesday, June 23, 2009

The Card Album decorated for a baby shower gift for Rock and Roll Mom to be

I have a baby shower coming up for a first time mom to be that's a bit on the rock and roll side and so I wanted to decorate The Card Album I was giving her to put all her baby shower cards in not too cute but still "baby boy" like. I went through the paper stash and found this cool black paper that was printed with the definition of baby all over it-perfect! Then onto the die cut stash and I thought the Hello Kitty tiny bunnies and the winged heart was a great combo of cute and tough.
So I simply went to town die cutting up a bunch of the cool papers. Then I just started to play around with all the shapes. Oh I should mention I inked the edges of my die cuts with silver, black and blue inks to outline them and make them pop a bit.

Here is my final The Card Album with a matching gift card that I used the same baby printed paper and die cut bunny.

I am really looking forward to this shower. I was put in charge of the memory game (30 or so items on a tray that everyone gets 2 minutes to look at, then it's taken away and then they have to write down everything that was on the tray), it was requested that it be all baby themed items so I am on a mission to gather up only baby items, not too easy of a task in a house that has never had a baby inside of it!


Bookmark and Share
Blog Widget by LinkWithin