


Showing posts with label stencil. Show all posts
Showing posts with label stencil. Show all posts
Tuesday, October 4, 2016
Easy way to dress up an old pair of boots with a stencil
Monday, August 22, 2016
Election year U.S. map and recycled dictionary page card


Monday, August 15, 2016
Glow in the Dark secret inspiration word art


I painted them with two different shades of FolkArt paint- Cascade and Dutch Aqua.


When the decorative stencil paint was dry I then laid the Waverly letter stencil over the decorative stencil (THIS IS IMPORTANT NOT TO REMOVE THE UNDER STENCIL!) and painted the letter with the glow in the dark finish paint. It doesn't show during the day but when the lights go out they show up.
Monday, March 7, 2016
Lucky stenciled March planner page celebrating St. Patrick's Day
I have a few planners going this year. I have so many ideas and wanted to experiment with lots of techniques so I need a few to work with. For this month of March planner page spread I thought I decorate with large letters across all the blocks. Then I started to add a few fun washi tape details.
 Tools and materials
Planner
Alphabet dies
Sizzix Big Shot Plus.
recycled clear plastic
Tombow recycled colored pencils
green print washi tape
small heart punch
backing paper from address labels sheets
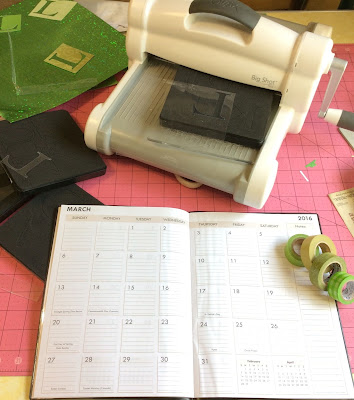 The first step was to die cut the letters, L, U, C, K, and Y out of recycled clear plastic to make the letter stencils.
 Then trace the letters onto the planner pages as you like them. Then color in each letter. I did some color fades and some contrasting outlines. This was fun to "color" in different ways and maybe even experiment with prints and patterns.
 I adhered a strip of washi tape to some scrap address label paper and punched a bunch of hearts. I used the hearts to make a 4 leaf clover on the 17th block and the remaining strip for a decoration up near the month title of the planner.
These techniques would work great for each month by using different words for each holiday that falls within that month.

Planner
Alphabet dies
Sizzix Big Shot Plus.
recycled clear plastic
Tombow recycled colored pencils
green print washi tape
small heart punch
backing paper from address labels sheets


These techniques would work great for each month by using different words for each holiday that falls within that month.
Wednesday, April 29, 2015
Art Prompt: stripes and stencil combination
I am pleased to share with you one of my first paintings. I am so thrilled about the new book The Paintbrush Playbook: 44 Exercises for Swooshing, Dancing, and Making Dazzling Art With Your Brush which is filled with a wealth of great starting points to make art.
 I used the gradient wash technique as my inspiration to make this background. The book calls for this technique to be done with watercolors but I simply tried it with acrylics in blue, white and just a touch of green to make blended horizontal stripes.
The second element to this painting was an eye chart made with a Tim Holtz Eye Chart Stencil. I like it the way it is with just these two features but I may add more at another point.
More about the Quarry Book:

The second element to this painting was an eye chart made with a Tim Holtz Eye Chart Stencil. I like it the way it is with just these two features but I may add more at another point.
More about the Quarry Book:
Sketch and paint right on the pages of
this fun, modern, approachable practice and inspiration book focusing on
one of the most popular drawing tools - the paint brush.
This playful, colorful exercise book is filled with fun, contemporary, beautiful illustrations by leading illustrator Ana Montiel.
The exercises explore mark making, patterns, geometrics, simple drawings, texture, and composition and includes professional tips and tricks that will enhance your skills as you work through the book. Each spread has one page filled with art examples and an exercise, with plenty of room to draw or paint right in the book. The Paintbrush Playbook is printed on high-quality, uncoated paper, allowing you to paint or draw anywhere that inspiration strikes.
Explore abstract drawing, pattern drawing, meditative doodling and more with this all-in-one learning and practice book. This is a great volume for artists, designers, doodlers, illustrators, painters, pattern illustrators, and zentanglers of all ages. You will not want to miss it!
Subscribe to:
Posts (Atom)


