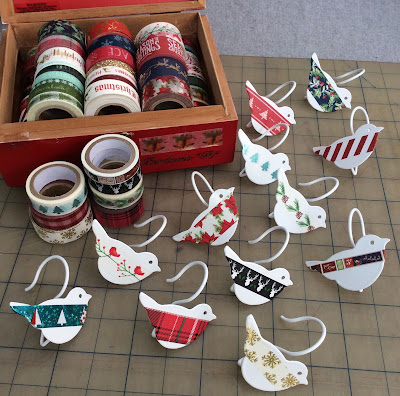
I scored these bird shower curtain rings some time ago and had planned to dress them up with washi tape. I ran across them when I was cleaning up the house prepping for Christmas decorating and thought why not finally get to this project and use Christmas washi tape.
I have to admit it took me about 15 minutes to cover the birds with a strip of washi tape. Oh and then anothe r10 minutes to swap them out. Not bad, hu?
I think after Christmas I will peal the Christmas washi tape off and replace it with something "spring" themed.
Showing posts with label washi tape. Show all posts
Showing posts with label washi tape. Show all posts
Monday, December 18, 2017
Wednesday, January 11, 2017
Easy way to organize and store your washi tape
I recently splurged a bit and got some new Create 365 washi tape from Me & My Big Ideas. So pretty!
I keep my washi tape in recycled cigar boxes. The rolls tend to get all messy in them so I came up with a way to keep them all organized in the cigar box.
I cut the plastic tubes the washi tape comes in and placed the halves in the box.
Voila! All neat and tidy, not to mention recycling the packaging.
Friday, March 18, 2016
How to make washi tape bunny ears planner clips
It's that time of year when everything should have bunny ears on it. In my world it's all the time but I know some people only bunny embellish around Easter. Want to dress up your planner pages with some bunny ears that are so easy to make with a bit of pink washi tape and a few paper clips? Read on.
Fold a strip of washi tape through the small bend in the paper clip and adhere the tape back on itself.
Where the tape is around the paper clip it can gather up a bit.
Trim the washi tape into a bunny ear shape. Repeat for the second ear. I made a bunch for my planner and for my travel journal.
I bet these would also make cute bookmarks to include in tiny Easter baskets.
Happy Easter everyone!
Monday, March 7, 2016
Lucky stenciled March planner page celebrating St. Patrick's Day
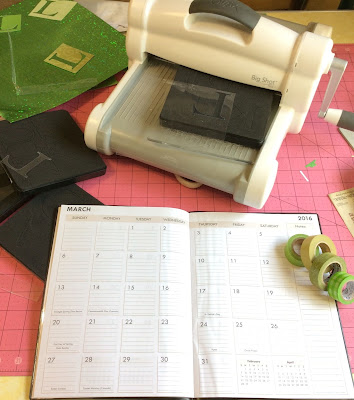
I have a few planners going this year. I have so many ideas and wanted to experiment with lots of techniques so I need a few to work with. For this month of March planner page spread I thought I decorate with large letters across all the blocks. Then I started to add a few fun washi tape details.
Tools and materials
Planner
Alphabet dies
Sizzix Big Shot Plus.
recycled clear plastic
Tombow recycled colored pencils
green print washi tape
small heart punch
backing paper from address labels sheets
The first step was to die cut the letters, L, U, C, K, and Y out of recycled clear plastic to make the letter stencils.
Then trace the letters onto the planner pages as you like them. Then color in each letter. I did some color fades and some contrasting outlines. This was fun to "color" in different ways and maybe even experiment with prints and patterns.
I adhered a strip of washi tape to some scrap address label paper and punched a bunch of hearts. I used the hearts to make a 4 leaf clover on the 17th block and the remaining strip for a decoration up near the month title of the planner.
These techniques would work great for each month by using different words for each holiday that falls within that month.
Wednesday, January 21, 2015
How to make a washi tape heart on book spines for a Valentine's Day decoration
It seems like altering books and arranging them in fun ways is really popular right now. I have always arranged and enjoyed my shelves of books. As a hug fan of washi tape my growing collection inspires me to make more crafts with it. So combine those 2 elements and this is what I came up with: a heart created with washi tape on the spines of books. These happen to be little blank sketchbooks with not very exciting covers-perfect for embellishing with washi tape.

I also used my Valentine washi tape to decorate a box patchwork style.
Materials
Red, white, pink washi tape
a collection of books sketchbooks are great but since washi tape comes off easy you could use virtually any book
scrap paper
pencil
scissors

Step 1: Place books with the spines up between 2 heavy elements to secure them in place
Step 2: Make a heart template out of scrap paper to fit within your book spine area.
Step: 3: Trace lightly the heat shape on the spines
Step 4: Place strips of washi tape on the spines using the pencil lines as your guide.
In my case I used washi tape with a white background and pink/red designs for the heart and more solid background red/pinks for the outside area around the heart.
Love Washi tape and looking for a great book filled with tons of pretty washi tape projects check out:

Washi Tape: 101+ Ideas for Paper Crafts, Book Arts, Fashion, Decorating, Entertaining, and Party Fun!
by
Courtney Cerruti
If you have never heard of washi tape, get ready to enter a bright new world of paper crafts! Originating in Japan, washi paper is stronger than wood-pulp paper making it perfect for use in projects like origami and scrapbooking. The tape is low tack and slightly transparent, in a mix of adorable colors and patterns, and a brilliant way to make all of your crafts even better. Perfect to use for parties. See how to create invitations, gift wrap, and goodie bags. Holidays have never been more colorful with ideas for ornaments, window adornments, and even garland.
Decorations for your home and office are easy and inexpensive when you use washi tape. Wall décor, borders and lampshades can become unique works of art and give your home a personal touch. You can even use washi tape in fashion. Dress up your glasses, shoes and jewelry using these simple ideas and designs. And because it's safe to use on delicate items, washi tape is great for personalized gifts like vases and photo albums. Washi Tape by Courtney Cerruti offers 101 amazing ideas that will make this new craft tape your new favorite thing. It's safe to use almost anywhere and great fun for children!

I also used my Valentine washi tape to decorate a box patchwork style.
Materials
Red, white, pink washi tape
a collection of books sketchbooks are great but since washi tape comes off easy you could use virtually any book
scrap paper
pencil
scissors

Step 1: Place books with the spines up between 2 heavy elements to secure them in place
Step 2: Make a heart template out of scrap paper to fit within your book spine area.
Step: 3: Trace lightly the heat shape on the spines
Step 4: Place strips of washi tape on the spines using the pencil lines as your guide.
In my case I used washi tape with a white background and pink/red designs for the heart and more solid background red/pinks for the outside area around the heart.
Love Washi tape and looking for a great book filled with tons of pretty washi tape projects check out:
Washi Tape: 101+ Ideas for Paper Crafts, Book Arts, Fashion, Decorating, Entertaining, and Party Fun!
by
Courtney Cerruti
If you have never heard of washi tape, get ready to enter a bright new world of paper crafts! Originating in Japan, washi paper is stronger than wood-pulp paper making it perfect for use in projects like origami and scrapbooking. The tape is low tack and slightly transparent, in a mix of adorable colors and patterns, and a brilliant way to make all of your crafts even better. Perfect to use for parties. See how to create invitations, gift wrap, and goodie bags. Holidays have never been more colorful with ideas for ornaments, window adornments, and even garland.
Decorations for your home and office are easy and inexpensive when you use washi tape. Wall décor, borders and lampshades can become unique works of art and give your home a personal touch. You can even use washi tape in fashion. Dress up your glasses, shoes and jewelry using these simple ideas and designs. And because it's safe to use on delicate items, washi tape is great for personalized gifts like vases and photo albums. Washi Tape by Courtney Cerruti offers 101 amazing ideas that will make this new craft tape your new favorite thing. It's safe to use almost anywhere and great fun for children!
Subscribe to:
Posts (Atom)


