Monday, August 15, 2016
Glow in the Dark secret inspiration word art
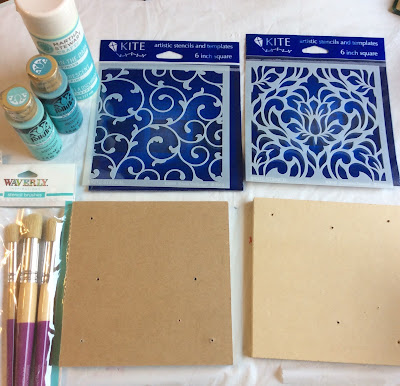
I started out with some recycled square pieces of wood.
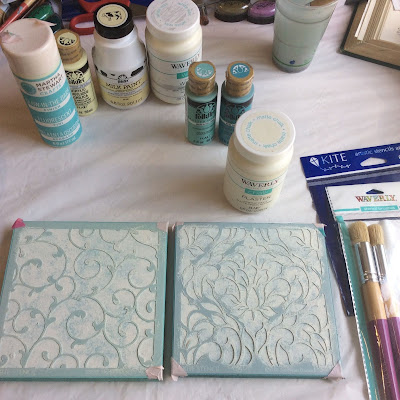
I painted them with two different shades of FolkArt paint- Cascade and Dutch Aqua.
When they were dry I taped the Floral Wallpaper and Nouveau Damask stencils onto the blocks and stenciled them using Waverly Chalk paint in plaster color.
When the decorative stencil paint was dry I then laid the Waverly letter stencil over the decorative stencil (THIS IS IMPORTANT NOT TO REMOVE THE UNDER STENCIL!) and painted the letter with the glow in the dark finish paint. It doesn't show during the day but when the lights go out they show up.
Friday, March 18, 2016
Color Blocked Craft Table and Accessories

Having a workspace that inspires creativity and keeps all your craft supplies organized can really make your crafting and art making time efficient and fun.
I made this large worktable out of a piece of plywood and Plexiglass with squares of Fairfield Oly Fun Craft Material in between for a modern color block look. The layers are all held together with office supply binder clips.
The center support of the worktable is a stack of recycled books! The coordinating desk accessories were embellished with all different types of paint and foil.
The stemware glass balls were painted with Testors paint.
The glasses were painted with Design Master Tint It Transparent Dye Spray Paints.
The jewelry box was given a new look with Plaid Ceramcoat Chalk paint.
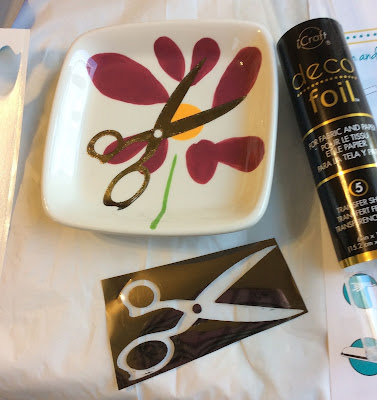
The little square plates were embellished with Silver Therm-o-web Deco foil scissors.
The little plastic animals were colored silver with the Testors Enamel paint marker.
And since I plan on spending a lot of time at my new craft table coloring in books like Leisure Arts' Art of Coloring Mandalas I sewed a new cushion for the vintage stool and embellished it with a Simplicity applique.
I am eager to try this technique on all sorts of recycled surfaces.
The next color blocked item on my craft desk was this piece of stemware that features little ball shapes. I painted each one with a color of Testors paint.
A project I see on Pinterest a lot is upcycling little toy animals by painting them with metallic paint. The Testors Enamel paint marker worked great for this!
In keeping with my color blocking theme I thought it would be fun to upcycle this jewelry box by painting each drawer a different color within the same color family.
I used a variety of blues, greens and grays of the Plaid Ceramcoat Chalk paint. I used a bit of painter's tape to hold the drawer pulls out of the way while painting. I also took the glass out and scraped the floral image off with a razor blade.
I love my vintage step stool but I thought it could use a bit more padding. The easiest way is to make a tie on cushion. I had a slipcover pillow that I could easily make a new coordinating slipcover for.
All I did was fold a piece of fabric over itself right sides facing with about a 4 inch overlap. Before stitching the sides I pined ribbons in each corner facing in.
When turned right sides out I placed ta Simplicity applique on the new pillow cover.
I am so excited about creating all sorts of things in my new creative space.
Monday, December 19, 2011
How to re-make old shoes into glitter-tastic new ones
 Shoes are most definitely my latest favorite thing to customize, alter and otherwise remake. I took my inspiration for this redo from the fabulous new book Sweat Shop Paris: Lessons from a Sewing Cafe.
 This is what the shoes looked like before their transformation, plain dark brown but the folds offered a great way to divide up the space and use different colors.
How I altered the shoes:
I painted several coats of Plaid's Extreme Glitter paint onto the different sections of the shoes. I used red and black.
Then I die cut 4 pairs of scissors out of some silver Mylar making sure I did them in mirror images for the right and left shoes using the Cuttlebug scissor die. One set went on the toes and the other on the outside ankle area.
To glue the scissor on I used Tacky Glue and a toothpick.
Then all that was left to do was add a few coats of Crafty Chica Glossy Gloss Varnish to give them that glitter patten leather look and protect the scissors.
If you are a fan of the "redo" I bet you will live this beautiful and inspiring book!
 More about the book from the publisher Andrews McMeel Universal:
Sweat Shop Paris: Lessons from a Sewing Cafe
by
Martena Dusss and Sissi Holleis
Crafters meet at the cafe and share ideas while renting equipment by the hour. In addition, classes teach novices how to sew, knit, crochet, and much more.
Thursday, October 27, 2011
How to make a secret window in a Glitter decoupaged book with a Fiskars Everywhere Punch
 You know how I love new tools! Today's new toy is the Fiskars Everywhere punch. This paper punch will make a square anywhere you want!
 I decided to try it out by making a secret window in a book. The Fiskars Everywhere punch worked like a dream! I punched about 3 pages at a time and I was done in a flash.
 The outside of my secret hiding place book (or I was thinking this would be a fun way to give a small gift item like one of my shotgun shell necklaces) needed some help!
I flipped through the book Encaustic Workshop: Artistic Techniques for Working with Wax and saw this page featuring these leaf skeletons and I happen to have a pack of them.
I know this book is all about encaustic but some of the ideas work for decoupage which is what I did with some Plaid Extreme Glitter Paint.
 I used both black and gold. I put down an irregular coat of each first. Then another coat of gold. While the 3rd coat of gold was still wet I pressed the skeleton leaves into it and topped it off with a 4th coat of gold.
I have a few other books that will have a "window of opportunity" soon!
More about the book from North Light Books:
 Encaustic Workshop: Artistic Techniques for Working with Wax
by
Patricia B. Seggebruch
In its purest form, encaustic painting is as simple as applying melted beeswax to an absorbent surface. In Encaustic Workshop, it becomes much more: a dynamic medium where anything goes and the possibilities are endless.
Packed with step-by-step techniques, helpful tips and diverse examples of completed works, Encaustic Workshop brings all the accessibility and excitement of a mixed-media workshop to your own workspace. If you're a beginner, you'll find everything you need to know to get started. If you're a more advanced crafter or fine artist, you'll discover things you never knew you could do with encaustic.
Instructions and photos will guide you as you learn to:
- Apply, layer, color and carve wax to create artwork rich with texture and depth.
- Create collages that combine encaustic with papers, fabric, found objects, image transfers and more.
- Experiment with charcoal, inks, watercolors, pastels and other mediums to create unexpected effects in the wax.
Sign your creativity up for this Encaustic Workshop - then just melt, paint and play!
Thursday, September 29, 2011
How to make a #6 recycled plastic skull Halloween necklace
 That's what the little clear skull is made of. Did you know that #6 plastic shrinks when you heat it? I picked up this fun fact on another recycled crafter's blog who lives in another country where getting Shrinky Dink (brand name) supplies can be difficult. I wish I still had the link to her blog but I alas have lost it!
 I started out by cutting the flat part of takeout container down to the size that would fit through the Sizzix die cutter using the Skull and Cross bones die. I punched two holes to join the top and bottom half and one in the top center to attach to the necklace before heating and shrinking with my Marvy Heat gun.
 I used a bamboo skewer to hold the shrinking plastic in place and help it not stick to each other when curling.
 Off to the stash for the rest of the necklace. I used a Plaid Chain Chain Chain over-sized clasps and one of their Flavor bows along with some old white chain reclaimed from an old necklace.
There you have it, recycled plastic Skull 2 of Halloween 2011!
Wednesday, August 31, 2011
How to cover an umbrella with a spiral of ruffles
 I decided I needed a shade umbrella to use in the summer and I thought I'd try dressing up a plain one with some ruffles.
The first step was to cut an old lace curtain into strips. This was super easy with my Simplicity Deluxe Rotary Cutter. I made them different widths starting at about 1.5-3.5 inches. I then just sewed down the center of each strip with a gather stitch (fancy term for the longest stitch length my machine will do).
 I started to hot glue the widest ruffle strips at the outer edge of the umbrella and worked my way toward the center in a spiral pattern.
 I sported my new set of Cathie Filian's fab new Hot Glue Gun Helpers which are so necessary when working with lace as the hot glue seeps through the holes in the lace!
 I used a bit of dress makers chalk to sketch the placement of the ruffles.
 I did make a tiny modification to one of my Hot Glue Gun Helpers as I have long fingernails so I cut a tiny slit in the top to let my finger nail pop out. I totally give these Hot Glue Gun Helpers a "thumbs up!"
Wednesday, January 6, 2010
It's not that I haven't been crafting, I just can't show you...yet
 I have been being creative non-stop!
CHA is coming up and Plaid Enterprises asked me to put my crafty magic on some of their new products.
I want to say thank you to all the guests I have produced and all the authors who have shared their knowledge in fabulous books to give me a giant wealth of creative skills and techniques to pull from. These aren't fiber crafts so I have been using lots of the new techniques I have picked up more recently.
Whoo-hoo!
I promise to share with you as soon as I can. Or at least have a personal project to post about soon!
Thursday, July 3, 2008
Pom Pom Ottoman in The Jo-Ann's Ad
 I did a book for Plaid awhile back where all the projects are made with their Knit Wit tool and doodle loom tool. Recently they asked me to make another one for Jo-Ann's with their yarn. And lo-and-behold- whoop, there it is, in the Jo-Ann's sale flyer!!! (top right corner)
This ottoman is made from tons of hand made pom poms on their largest tool and an Ikea inflatable cube (about $8ish)
 So just in case you happen to have a big a** manicure-not to worry making pom poms is a total snap with the big nails!
 Here the ottoman is "in progress" is anyone else having a "tribble flashback?"
Monday, March 24, 2008
Knit Wit and Pom Pom Projects over at Plaid


And if you would like to see projects I designed with Crewel work samples that appeared on Home Shopping Network click back to this post for a video link!
Wednesday, November 14, 2007
Crewel Tray for Home Shopping Network

http://crafts-sewing.hsn.com/plaid-wool-and-hoop-crewel-designs-crafts-kit_m-10030808_xp.aspx
I was scrolling through my iphoto and I ran across these projects I crafted for Plaid (yes, I work for Plaid) isn't it kiszmet (sp?) and I thought I'd share this one. It was a simple wood tray with a glass base. It originally had a photo mat that would hold 4 photos. I simply cut a new single large mat and covered it with wool felt and placed the crewel embroidery in it. For a video of the HSN segment that it was used in the display as a sample of what you can do with their kit click on the above link!
The crewel designs are by Katherine Shaughnessy, I had picked up her book, The New Crewel) previousely to getting this assignment (kiszmet again) I am working on a variation which hopefully will be able to post soon. So stay tuned!


