Showing posts with label JHB Buttons. Show all posts

Tuesday, May 8, 2012

How to make a leather and recycled plastic Steampunk style cuff

 Today's latest creation is another in my recycled leather cuff series. I didn't realize it was going to be a series but here is the third one I've made. Go figure. OK so here is how I did this one.
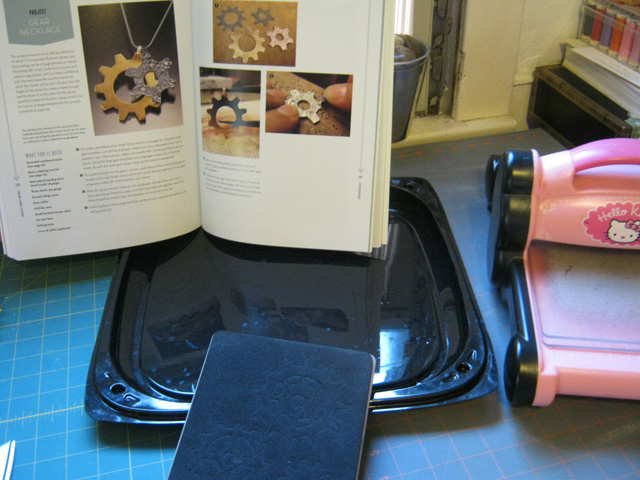
 I scored a party platter at...wait for it...a party of all places. A huge piece of smooth black plastic perfect for die cutting. I trimmed off the groove part around the edge and sent it through the Sizzix die cutter using the Tim Holtz Alterations Gadget Gears Die.


I should also back up a bit and say the inspiration for this whole project came from flipping though the book Hot Connections Jewelry:The Complete Sourcebook of Soldering Techniques and seeing this cool gear necklace but since I'm on a cuff kick that's what I was going to make.


Once the plastic was cut I thought it looked a bit shiny so scuffed it up with a piece of sandpaper.

 Then I sewed the gear on with a JHB Steampunk gear button on the topside of the leather (after cutting a tiny hole for the shank to go through) and a flat button on the back so the shank button wouldn't wobble around too much.
I thin stitched a pair of "D" rings I had cut off an old pair of sneakers to secure the sides of the gear and have them wrap around my wrist.

The cuff's closure is just a bit of Velcro i sewed onto each end.

If you like to make (or be inspired by) modern style jewelry I bet you will love:
Hot Connections Jewelry:The Complete Sourcebook of Soldering Techniques
by
Jennifer Chin

More about the book from the publisher Potter Craft:

"The art of soldering—permanently joining metal components with a torch and solder—can open up a new world of creative possibilities for jewelry makers.

In
Hot Connections Jewelry, award-winning jewelry designer Jennifer Chin guides you through every step, from choosing a torch to basic techniques like sawing, filing, and riveting, as well as more advanced techniques like creating surface textures, setting stones, and using inlay.

With 23 in-depth lessons and 15 stunning projects, as well as inspiring examples from contributing artists,
Hot Connections Jewelry is your essential guide to unleashing your creativity and confidence in jewelry making."


Wednesday, June 2, 2010

JHB Steampunk Button Necklace inspired by the button jewelry in the book Button Ware by Amy Barickman

I have always been a fan of the industrial look so now that Steampunk style stuff is really hot there are lots of great findings readily available. This includes these great JHB Steampunk Style buttons. Not many of my clothes have button closures so I thought I could incorporate these cool buttons into jewelry. Off to a book on the subject for a little inspiration Button Ware by Amy Barickman was filled with great stuff that got my creativity flowing.

I found a cool light blue marbleized big 80's earring and the steampunk button looked really cool in it. To secure it I formed a loop at one end of a piece of wire and linked it to the bottom jump ring. I then ran the wire through the shank of the button and looped it through a second time to secure it in place on the wire. All that was left to do was form another loop at the top and link it onto the top jump ring.

I took the earring post off and slid a chain through the top jump ring as well.

There are lots of cool "donuts" out there and I bet you too could go through your old jewelry and find something this button framing technique would work great with to feature a button you love!

More about Button Ware by Amy Barickman from the publisher:


"Gathered together, in the pages of Button Ware, are some of the trendiest and best-looking projects available to today's crafty, fashion-conscious designers. Amy Barickman, owner of Indygo Junction and The Vintage Workshop, and self-confessed button addict, couldn't resist combining her vintage button collection with the colorful and fashionable buttons offered by world importer JHB International the leader in original and stylish buttons.

In this 80 page colorful collection, filled with 90 gorgeous photos and 33 inspiring projects (with numerous variations), they combined the strengths of their companies to create this colorful collection filled with inspiring projects from leading designers. It will teach beginners simple techniques for turning both new and vintage buttons into fashion statements, some so simple that you won't believe you made it. For those who are more experienced crafters, these ideas will inspire them to new heights of creativity.

With easy-to-follow illustrations and detailed photography, crafters will learn how to expand their accessories at a fraction of the cost of original designer pieces and enjoy creating jewelry, embellishments, and fashionable, wearable designs at the same time
."

Thursday, February 11, 2010

How to make a button covered headband with a recycled t-shirt inspired by a project from the book The Paper Bride by Esther K. Smith

Love is in the air....love of the book:
The Paper Bride: Wedding DIY from Pop-the-Question to Tie-the-Knot and Happily Ever After by Esther K SmithI'm not sure which I love more, sticky notes or crafting? As you can see my copy of The Paper Bride has lots of sticky notes which means I want to make lots of stuff from it. Surprising, I know being that I am so far from the marring type it's not funny. But that doesn't mean the great projects contained in it can't be used for other events and just plain everyday creativity.
The project from The Paper Bride that was my inspiration was one that you sewed buttons on a ribbon to make a headband that looked really cute. (Yes, this is probably the only non paper project in the book but it just called to me today and I'll get to the yummy paper projects next!) So off to my stash of JHB buttons and my cut up t-shirt scraps. I was wanting one with stretch.

TIP: I like to keep my buttons in pie tins and as I'm sorting though them I transfer them from one to another. When I'm done I dump them all back into one and slide the empty one underneath the full one.

I cut a loop of t-shirt that fit snugly around my head and then just picked out random buttons and stitched them on. As I went I did gather the fabric a bit at each button. This made it a bit more dimensional. Oooh, me breaking out of my standard rigidness. It was one of my new year's resolutions ya know.
More from the publisher Potter Craft about The Paper Bride:

"The one-stop guide to making a celebration that's all about you with ubiquitous, affordable, recyclable paper! Letterpress artist, designer, and once-bride Esther K. Smith inspires you with one-of-a-kind invitations, albums, guest books, and more. Planning an elaborate event? A simple, sophisticated soiree? Or something wild and wonderful? Customize your wedding with fresh paper ideas from the author of the classic How to Make Books and the ingenious Magic Books & Paper Toys. Learn to make your own exciting, affordable mementos, invitation wraps, pop-up maps, save-the-date postcards, and party décor—projects with maximum impact that require only simple tools and basic skills . New to paper crafts? Start with lined envelopes. Ready for a challenge? Learn to stitch special bindings for your guest book and photo album. There is even a project for the groom-to-be. Just grab the good scissors, choose your paper, and begin! Smith's inventive techniques and no-nonsense wit will inspire you to make your own paper-perfect wedding. About the Author Esther K. Smith owns and operates Purgatory Pie Press in New York City, which is a letterpress printer and creative partnership. The press has exhibited work at the Victoria and Albert Museum, the Metropolitan Museum of Art and Smith College, as well as at book centers throughout the world."
Blog Widget by LinkWithin