Showing posts with label recycled craft. Show all posts

Friday, January 10, 2020

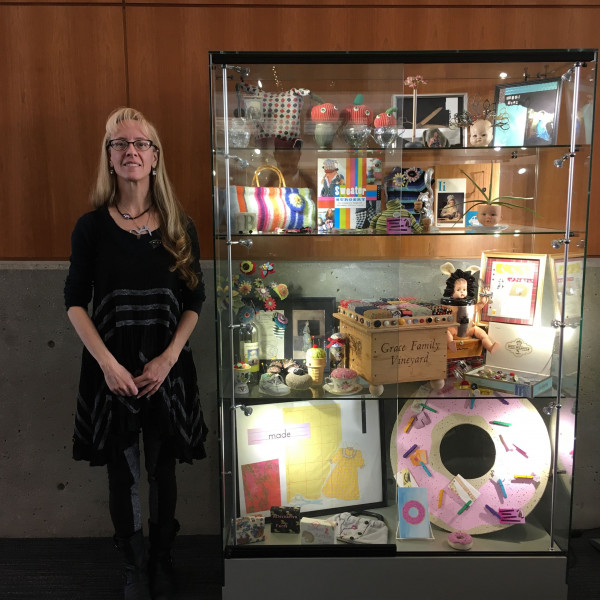
Recycled Art and design retrospective at the Glendale Main Library by Stefanie Girard

Watch a video that features close-ups of this fun case.


I was invited to create an exhibit at the Glendale Main Library of recycled art and creations.
stefanie L. Girard, Art, collage, art exhibit, gallery case, Glendale Library
This was fun to put together as I have been creating recycled things for a loooooong time! Some of these projects are from my book Sweater Surgery, some have been featured here or on other websites. And some are brand new! I hope you enjoy and like and subscribe to my YouTube channel to see more of my video walk throughs of art shows. I will have another one very soon as I just installed a piece for The Burbank Art Association's Board Member show.

Monday, December 18, 2017

Embellish bird shower curtain rings with washi tape

washi tape bird shower curtain rings Christmas decoration
I scored these bird shower curtain rings some time ago and had planned to dress them up with washi tape. I ran across them when I was cleaning up the house prepping for Christmas decorating and thought why not finally get to this project and use Christmas washi tape.
washi tape bird shower curtain rings Christmas decoration
I have to admit it took me about 15 minutes to cover the birds with a strip of washi tape. Oh and then anothe r10 minutes to swap them out. Not bad, hu?
washi tape bird shower curtain rings Christmas decoration

I think after Christmas I will peal the Christmas washi tape off and replace it with something "spring" themed.

Friday, November 24, 2017

How to make a Christmas tree shaker card with heart dies

Heart die cut Christmas tree shaker card Crafter's Companion Stefanie Girard Buttons galore
It can be fun to take basic shapes like a heart and transform it into something like this Christmas tree. The heart dies from Crafter's Companion are mixed-media dies and they cut through cardstock and Fun Foam at the same time which is how you make this shaker card.
Heart die cut Christmas tree shaker card Crafter's Companion Stefanie Girard
First up I die cut the 3 hearts at the same time layering the silver cardstock and Fun Foam.
Heart die cut Christmas tree shaker card Crafter's Companion Stefanie Girard Buttons Galore
Then I glued a piece of recycled plastic container between the silver cardstock and Fun Foam. I played around with different sequins and embellishments from Buttons Galore on the top of the card until I liked the look.
I trimmed the black Fun Foam down to about a 1/4 inch.
Heart die cut Christmas tree shaker card Crafter's Companion Stefanie Girard Buttons Galore

 I then filled the three upside down hearts that formed the Christmas tree with gold sequin mix and glued the green glitter cardstock together.

Then I glued on the half pearls and buttons to the top layer of the card.

This technique for cutting the cardstock and fun foam makes creating shaker cards so easy!


Monday, March 27, 2017

Die cut recycled shampoo tube planner charm

Gemini die cutting machine Crafter's Companion stefanie Girard bird planner charm
I love making planner charms and clips. It's like making jewelry for my planners, sketchbooks and mixed-media journals.

What do I like making my planner charms out of? Recycled materials of course and my new bird mixed-media dies and Gemini die cutting machine from Crafter's Companion are the tools I am in love with cutting all sorts of recycled materials with.

Gemini die cutting machine Crafter's Companion stefanie Girard bird planner charm
For this planner charm I die cut a shampoo tube in beautiful copper color.
Gemini die cutting machine Crafter's Companion stefanie Girard bird planner charm
I opened up the tube and washed it out. I taped the tiny mixed-media bird die in place and ran it through the machine.
Gemini die cutting machine Crafter's Companion stefanie Girard bird planner charm

As well as cutting the bird shape it also curved it slightly. This works out great as when I glued the bird to the round earring wire the glue pooled nicely on the back side.

I added a pearl bead onto the earring wire before closing the wire up.
The earring wire is linked to a clip with a jump ring along with a few bead dangles in a variety of colors and shapes.
I added a bit of glitter washi tape to the clip to dress it up further.


Sunday, October 9, 2016

Mummy cat rubber stamped and redacted recycled book page Halloween decoration

redacted book page altered art mummy cat rubber stamp Halloween decoration
Have you tried redacting book pages to make quotes and fun phrases? I love it. It's like a puzzle but creative.
redacted book page altered art mummy cat rubber stamp Halloween decoration
I thought I'd make some more book cover art with the redacted book pages and adding my favorite new Halloween stamp - a mummy cat from Judikins.
redacted book page altered art mummy cat rubber stamp Halloween decoration
 This page I actually found Kat and craft on the page!

The other 2 say

"One of the problems...an ordinary...person....is to keep a covert eye on him. He....would...hide behind.....tombstones.....of course.

and

What do we know?....asked....the....tail....he's....to...destroy....incriminating.....information.

Try hide and seek with words!

Tuesday, October 4, 2016

Easy way to dress up an old pair of boots with a stencil

bird stencil boots stencil1
I can't stop stenciling! I had this great bird stencil from Stencil1 and an old pair of motorcycle boots that were just calling for embellishment. I slipped some cardboard into the boot to flatten it a bit and used a Sharpie to draw in the bird onto the side of the boots. I'm thinking about hand painting some color into the outline of the bird shapes?

Thursday, September 15, 2016

How to make yarn cone candy corn Halloween decorations

yarn candy corn Halloween decoration Stefanie Girard
As a recycled crafter I think my eyes have this way of looking at things and seeing something else....or it just could be my declining bad eyesight :) When sorting through my yarn stash I ran across a yellow one and thought it would make a fun candy corn decoration.
yarn wrapped candy corn Halloween decorations Stefanie Girard
So I went to my other boxes to see if I could find more and it turns out I had 5 cones of yarn in various sizes.
yarn stash yarn wrapped candy corn Halloween decorations Stefanie Girard
 Next step was to gather up the white, orange and yellow yarns, I even made a candy corn out of the boxes - I swear I didn't think of this it just happened when I placed them on the floor to photograph and there it was!

I had fun picking out different shades and textures of the yarns.

TIP: Start with the top and bottom of the cones then wrap the middle section I found it easier to get the proportions right and get the yarn to stay in place.

Oh and if you like the little guys on top- they are simply acorns painted orange and then little jack-o-lantern faces drawn on with a Sharpie.

Monday, May 23, 2016

50 Small Paintings-Done!

My New Year's resolution for 2015 was to do the 50 small paintings in the book Learn to Paint in Acrylics with 50 Small Paintings. It took me a bit longer to finish them all and even a bit longer to photograph them and write this post. But I should also add I built the shelves along the way to display them too!
50 small paintings stefanie girard how to paint, paint tutorials
 And me being me I did them all on recycled plywood I had leftover from a construction project.
50 small paintings stefanie girard how to paint, paint tutorials
I cut and sanded the plywood down to 5 inch squares.
50 small paintings stefanie girard how to paint, paint tutorials
Then I primed all the wood squares to get them ready to do each painting.
50 small paintings stefanie girard how to paint, paint tutorials
This was the first painting. Boy, that seems like forever-ago!
50 small paintings stefanie girard how to paint, paint tutorials

I can't tell you how fun this was to do! The directions are excellent and each painting is such a pleasure to paint.
50 small paintings stefanie girard how to paint, paint tutorials
I would end up working on several at a time as you need to allow the paint to dry in some cases so it's fun to start the next and jump back and forth. I highly recommend this book and this process. As you can see the collection looks great and you learn so much. I have already started to use the techniques I learned by painting these pieces in new original paintings.

Friday, March 18, 2016

Color Blocked Craft Table and Accessories

  I have entered this Color Block Craft Table and Accessories project in the Fave Crafts Craft Contest 2016- If you like it please pop on over to their site and VOTE for it! I could win $1000 bucks! Thanks in advance for your support :)
Color block craft table stefanie girard

Having a workspace that inspires creativity and keeps all your craft supplies organized can really make your crafting and art making time efficient and fun. 
How to make a color block craft table squares of fabric recycled books Stefanie Girard

I made this large worktable out of a piece of plywood and Plexiglass with squares of Fairfield Oly Fun Craft Material in between for a modern color block look. The layers are all held together with office supply binder clips. 


The center support of the worktable is a stack of recycled books! The coordinating desk accessories were embellished with all different types of paint and foil. 


The stemware glass balls were painted with Testors paint. 
The glasses were painted with  Design Master Tint It Transparent Dye Spray Paints. 
The jewelry box was given a new look with Plaid Ceramcoat Chalk paint. 
The little square plates were embellished with  Silver Therm-o-web Deco foil scissors. 
The little plastic animals were colored silver with the Testors Enamel paint marker. 

And since I plan on spending a lot of time at my new craft table coloring in books like Leisure Arts' Art of Coloring Mandalas I sewed a new cushion for the vintage stool and embellished it with a Simplicity applique.


I had a scrap of Plexiglass left over from my film industry days and it was a bit smaller than an 4x8 sheet of plywood so I had to trim the plywood down. If you are making this with new materials your plexi and plywood will likely be the same size so you can skip this step.

Fairfield Oly Fun Craft Material squares to make color block craft table stefanie Girard

I used Fairfield Oly Fun Craft Material to cover the plywood. This material comes in pre-cut squares in a great variety of colors as you can see so it was easy to lay them out and arrange them in a pretty pattern.

Then I laid the plexiglass over the squares and secured it with office supply binder clips.

One of the fun things about this color block craft table is that since it isn't permanently secured you can swap out the color blocks anytime!
To give a new look to these vintage glasses I used a variety of Design Master Tint It Transparent Dye Spray Paints.
I masked off the bases so they would stay clear. While painting them I placed them on top of some cardboard containers. This made it easy to rotate the glasses for nice even coverage

scissor transfer scissor art to plate stefanie Girard
To embellish the little plates I die cut a piece of Therm-o-web Easy-cut adhesive and applied Silver Therm-o-web Deco foil.
deco foil silver add scissors to plates Stefanie Girard
I am eager to try this technique on all sorts of recycled surfaces.
Testors paint glasware stem Stefanie Girard
The next color blocked item on my craft desk was this piece of stemware that features little ball shapes. I painted each one with a color of Testors paint.
Testors enamal marker paint toy animals Stefanie Girard
A project I see on Pinterest a lot is upcycling little toy animals by painting them with metallic paint. The Testors Enamel paint marker worked great for this!
chalk paint upcycle jewelry box drawers Stefanie Girard
In keeping with my color blocking theme I thought it would be fun to upcycle this jewelry box by painting each drawer a different color within the same color family.
how to paint drawers, chalk paint Plaid, Stefanie Girard

I used a variety of blues, greens and grays of the Plaid Ceramcoat Chalk paint. I used a bit of painter's tape to hold the drawer pulls out of the way while painting. I also took the glass out and scraped the floral image off with a razor blade.
easy slip on pillow cover with corner ties stefanie Girard
I love my vintage step stool but I thought it could use a bit more padding. The easiest way is to make a tie on cushion. I had a slipcover pillow that I could easily make a new coordinating slipcover for.

All I did was fold a piece of fabric over itself right sides facing with about a 4 inch overlap. Before stitching the sides I pined ribbons in each corner facing in.
how to sew an easy pillow cover with ribbon ties stefanie girard
 When turned right sides out I placed ta Simplicity applique on the new pillow cover. 
I am so excited about creating all sorts of things in my new creative space.
how to make a color block craft table with recycled books and fabric squares Stefanie Girard


Wednesday, December 23, 2015

Last minute recycled office supply Christmas decorations

I love office and school supplies. I collect vintage supplies and along with new supplies they can be recycled into new and fun decorations.
scissor star, ruler star, file folder star Christmas decorations office supply decorations stefanie girard
I created the scissor snowflake simply by wiring the finger holes together. The hinged ruler was the easiest by simply opening it partially to create the star. The star on the right was a bit of a funny challenge idea.
scissor star, ruler star, file folder star Christmas decorations office supply decorations stefanie girard
I was given a stash of hanging file folder with the challenge, "maybe you can make something with all of these?"

I spotted the traditional stick star craft project in a magazine and I thought about my stash of hanging file folders.

The stars were easy to make.

I simply removed the metal hanger from the paper folder and overlapped them into the star shape.
I secured the points with a bit of wire.

I glued vintage typewriter keys onto the tips that spelled out PEACE for a final decorative touch.

Happy Holidays everyone!

Monday, December 14, 2015

How to make a Milk and Cookies Table for Santa with 3 sticks and a Walnut Hollow Country Round

I have been wanting to make this project for a while but had to wait until we had a wind storm that brought down just the right branch. Well, that happen and so now I can share with you my Milk and Cookies table for Santa project.
Milk and cookies for Santa table, 3 sticks, wood slice, basswood country round, stefanie girard
It works great too if you think Santa prefers an adult beverage and mixed nuts :)
Milk and cookies for Santa table, 3 sticks, wood slice, basswood country round, stefanie girard
Materials and Tools
3 sticks/branches about 1 inch in diameter
Walnut Hollow Country Round Extra Large
Twine
Hot Glue
Milk and cookies for Santa table, 3 sticks, wood slice, basswood country round, stefanie girard
Cut the sticks to about 23 inches.

Hold the sticks together and tie them together at the center of the bunch of sticks.

Splay the sticks out in a twisting motion and place the wood round on the sticks. At this point adjust the sticks so that the table is perfectly level.

Continue wrapping the sticks with twine.

Add hot glue in the middle of the three sticks and glue the ends of the twine into the center.

This will lock the sticks in place and make a nice band of twine on the table.

ugly sweater cookies, imprint image in Christmas cookie, stefanie girard
 I did want to share the ugly sweater cookies I leave out for Santa. I imprinted a reindeer on the cookie doe.

Some cookies I filled in the shape with green sugar and some I rubbed the green sugar  into the imprint to form an outline.


Tuesday, December 8, 2015

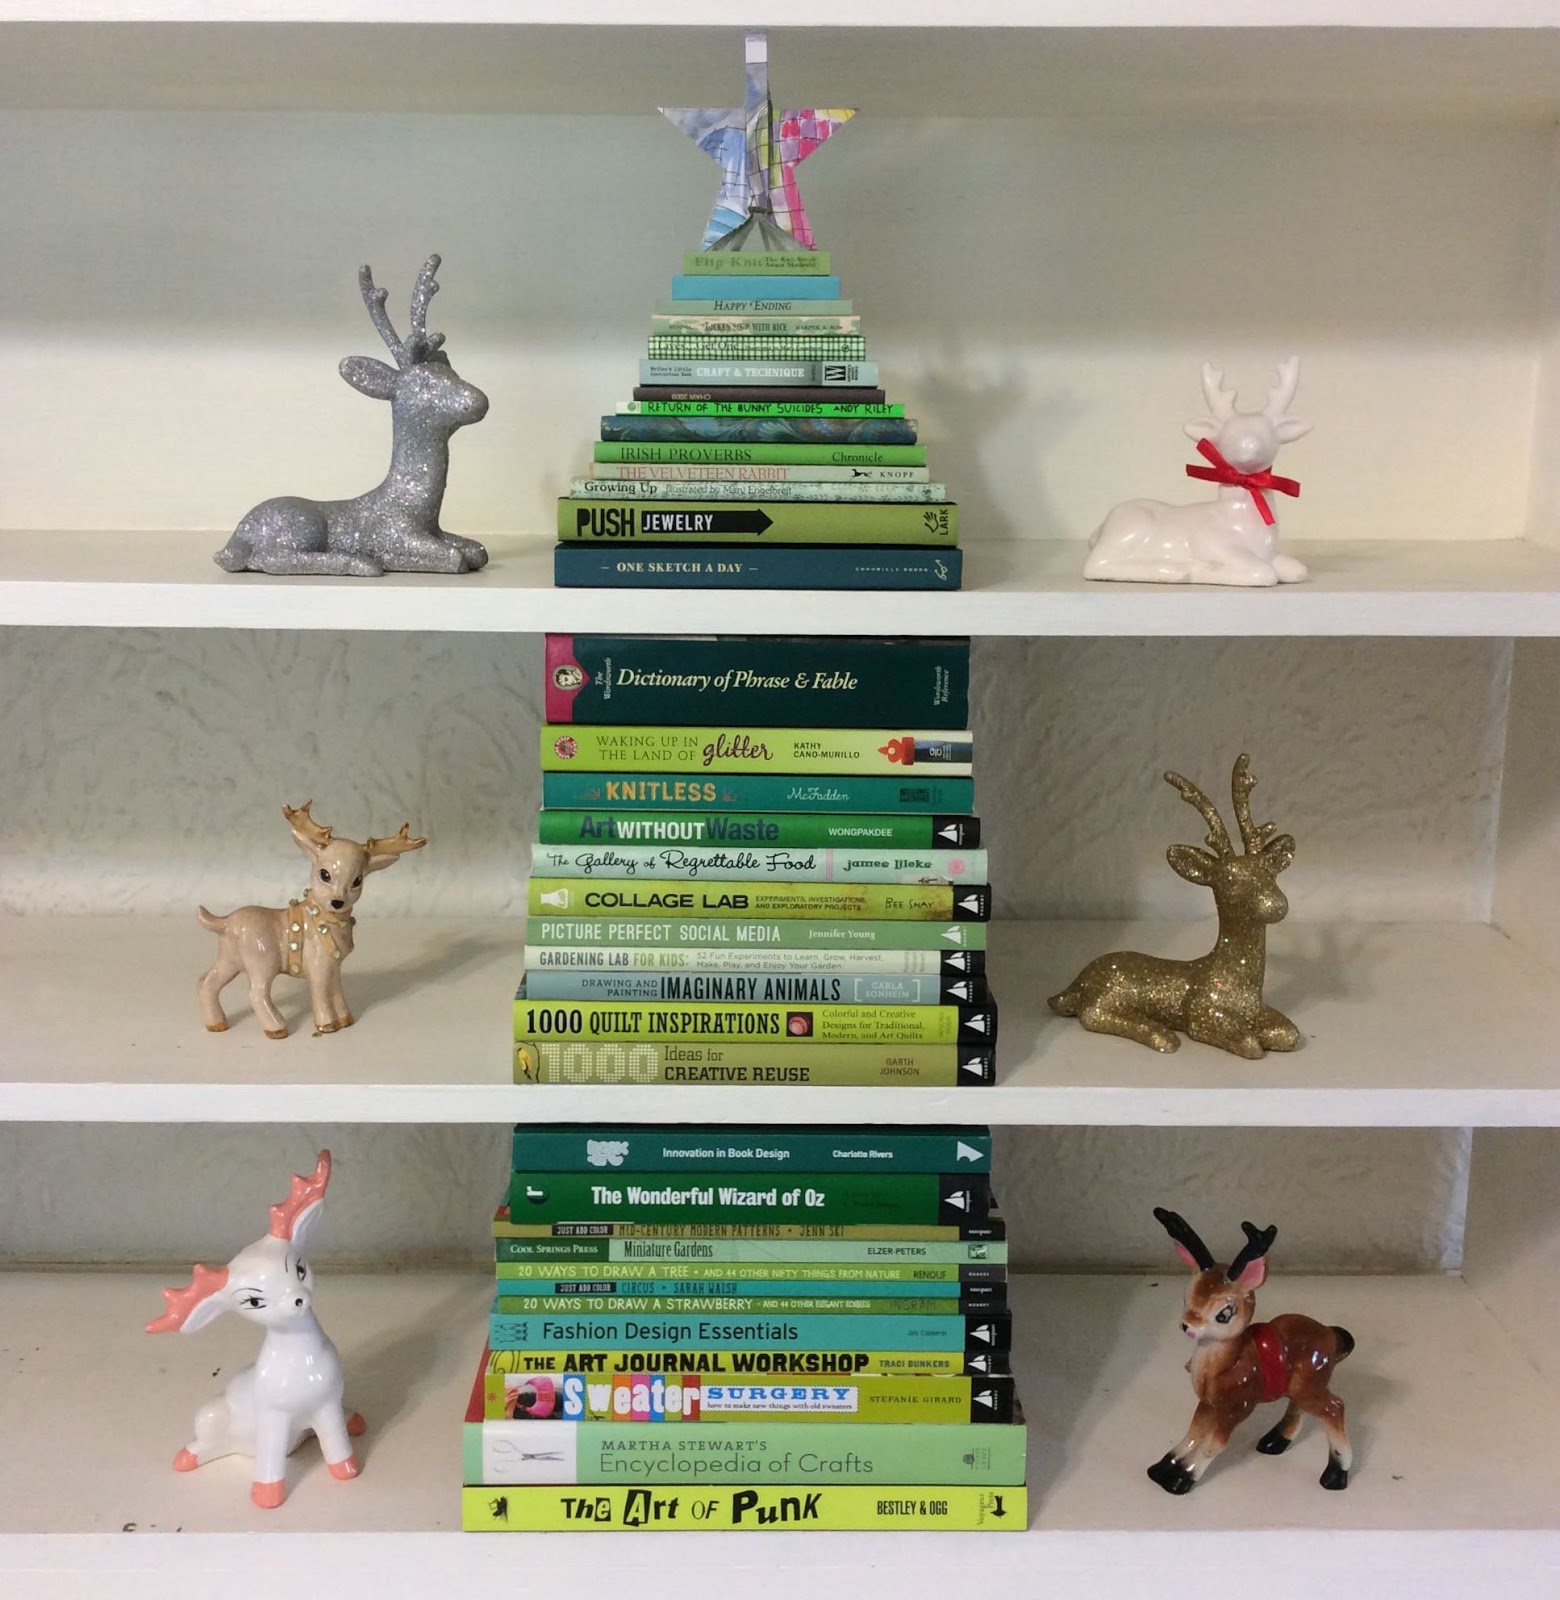
A sketch book cut into a star shape is the perfect topper for a stack of green books Christmas tree

My books are not only a wealth of information and inspiration they are a creative material as well. I gathered up all my green ones to make this Christmas tree. I thought it would be fun to cut a sketch book into a star shape to top it off (I loved my letter cutting project that spelled out a word).

Cut book into shape with Dremel moto-saw, christmas Stefanie Girard, stack green books into Christmas tree
This is super easy to do with a Dremel Moto-Saw.

Cut book into shape with Dremel moto-saw, christmas Stefanie Girard
I printed out a star and wrapped it around the book and outlined the shape on the book.
Cut book into shape with Dremel moto-saw, christmas Stefanie Girard
I rough cut the book down to a small area around the star. I did this as it is easier to cut into each "v" of the star from the out side straight in.
I plan on cutting more books into fun shapes in the new year.  Try it!
Blog Widget by LinkWithin