As a recycled crafter I think my eyes have this way of looking at things and seeing something else....or it just could be my declining bad eyesight :) When sorting through my yarn stash I ran across a yellow one and thought it would make a fun candy corn decoration.
So I went to my other boxes to see if I could find more and it turns out I had 5 cones of yarn in various sizes.
Next step was to gather up the white, orange and yellow yarns, I even made a candy corn out of the boxes - I swear I didn't think of this it just happened when I placed them on the floor to photograph and there it was!
I had fun picking out different shades and textures of the yarns.
TIP: Start with the top and bottom of the cones then wrap the middle section I found it easier to get the proportions right and get the yarn to stay in place.
Oh and if you like the little guys on top- they are simply acorns painted orange and then little jack-o-lantern faces drawn on with a Sharpie.
Showing posts with label Yarn. Show all posts
Showing posts with label Yarn. Show all posts
Thursday, September 15, 2016
Monday, June 20, 2016
How to make red, white and blue 4th of July pom poms to top of a bottle of party wine
I love pompoms and dressing up a bottle of wine with a big one when when heading out to a party makes a fun decoration to give to a hostess. This red, white and blue giant pom pom will be fun to bring to a 4th of July picnic.
Gather up red, white and blue yarn along with your pompom maker and a sharp pair of scissors and plate.
This pom pom will consist of 2 pompoms sewn together. For the first side of the pom pom wrap with red primarily and then a bunch more white. As much as you can get on your pompom maker.
Trim off the pompom maker and set aside.
Make the second one with a base of blue and again cover it with white wraps.
Stitch the two pom pom halves together with the white section together.
Hold the pom pom over the plate and trim the pom pom round.
Tie the pom pom on a bottle of wine.
Tuesday, March 22, 2016
How to make pom pom carrot Easter decorations
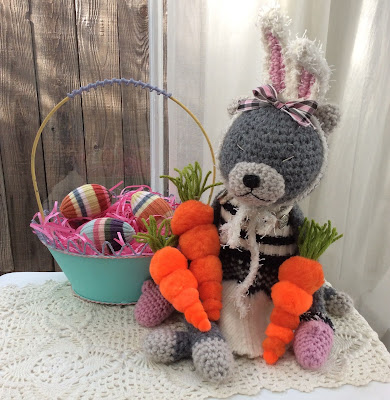
No matter what new materials come out I still seem to think of ideas to make with pm poms. Today's fun little pom pom creations are carrots that my amineko thinks are just too fun not to snuggle, I know she doesn't look happy but she is :)
All that you need for these little creations are a variety of sizes of orange pom poms, a bit of green yarn and a hot glue gun. Simply glue the pom poms together from smallest to largest.
To make the carrot top I looped a few wraps of yarn around 3 fingers and tied a knot around them with another piece of yarn. Then I tied a piece of yarn around all the loops. Then I cut the loops open and glued the tied end into the large pom. I made a bunch because quite frankly they were so easy and cute.
Wednesday, September 30, 2015
Skinny scarf turned into a Halloween pumpkin for the season
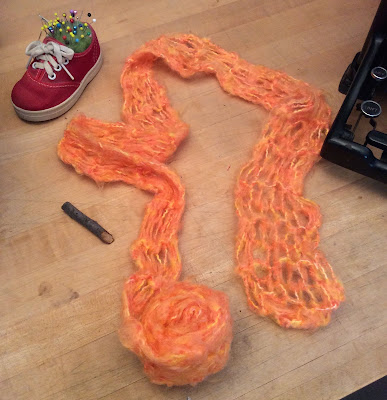
I have an entire tote of skinny scarves. I was addicted to knitting them as I loved the instant gratification they offered and I loved wearing them. I miss them and thought I should figure out what else I could use them for when I wasn't wearing them. Well, this fuzzy multi-tone orange skinny scarf made a great pumpkin.
The best part of this project is it is made in about 1 minute and can be undone in about 30 seconds. If you want to wear it there is no damage to the scarf.
Simply roll up the scarf and pop a few pins in to keep the end rolled up. I stuck a small piece of a branch in the top to form a stem.
I can't wait to see what else I can come up with with the 4,000 (not really) skinny scarves in the stash.
Wednesday, September 23, 2015
Yarn ball pumpkin fall decoration inspired by Conan O'Brien's Bill Tull Holiday Tips segment
If you watch the Conan O'Brien show and have seen the Bill Tull Tips segment you will appreciate the simplicity of this fall decoration that consists of yarn balls and sticks to make pumpkins. Literally this project took me less than 5 minutes!
Simply go out to your yard or your nearest tree and clip a branch into small segments.
Go to your yarn stash and pull out your orange balls of yarn. Tuck the label inside/under the ball and pop the stick in the center top.
Boom, pumpkin!
P.S. if you wanted to get fancy, cut shapes out of black felt and attach them on to the yarn balls to form Jack-o-lanterns.
When the season is over simply wrap the label back over the yarn ball and return it to the stash zone and pop the sticks in the yard.
Thursday, April 16, 2009
Yarn scrap bead from the cool new book: Strands
If you like fabric or fiber or anything in between, around, under, over or even near them you will love the wildly cool stuff in this book:
Strands: Creating Unexpected Fabrics And Fashionable Projects
by
Jacqueline Myers-Cho
I love all things fiber and fabric and the never ending ways to cut them up and put them back together. So this book was for me! There are some really new and innovative designs that really are speaking to my avant garde side that I am embracing at the moment!
The first project I had to try was the Thread Ball bead:

I made my thread ball with yarn though, I happen to have a huge stash of yarn scraps, go figure. As you can see the directions and photographs in the book are wonderful and it went like a dream!

I decided I was going to where my yarn ball bead as a single drop so I bent a piece of wire into a small "U" at one end and cut the other end at a severe angle so it would poke through the yarn ball bead as easily as possible. Then I just formed a loop at the top and slipped it on some ball chain. Well there you have how I made some yarn scraps into a bead. Off to find a sweater to try the loopy technique featured on the cover!
Tie one on this weekend! Ya know what I mean?

Strands: Creating Unexpected Fabrics And Fashionable Projects
by
Jacqueline Myers-Cho
I love all things fiber and fabric and the never ending ways to cut them up and put them back together. So this book was for me! There are some really new and innovative designs that really are speaking to my avant garde side that I am embracing at the moment!
The first project I had to try was the Thread Ball bead:

I made my thread ball with yarn though, I happen to have a huge stash of yarn scraps, go figure. As you can see the directions and photographs in the book are wonderful and it went like a dream!

I decided I was going to where my yarn ball bead as a single drop so I bent a piece of wire into a small "U" at one end and cut the other end at a severe angle so it would poke through the yarn ball bead as easily as possible. Then I just formed a loop at the top and slipped it on some ball chain.
 Well there you have how I made some yarn scraps into a bead. Off to find a sweater to try the loopy technique featured on the cover!
Tie one on this weekend! Ya know what I mean?
Tuesday, November 27, 2007
TNNA flashback-Drew, Vickie and me

As TNNA aproaches it brings memories of last year. Here is a picture of me and Drew, The Crochet Dude getting books signed by Vickie
Vision of yarn dance in my head!
Subscribe to:
Posts (Atom)


