Thursday, December 6, 2012

How to make recycled cup glitter votive holders

Christmas=Glitter 
In my book anyway and speaking of books, ReCraft: How to Turn Second-Hand Stuff into Beautiful Things for Your Home, Family and Friends is packed full of awesome recycled crafts like these recycled cup glitter votive holders.
 
They are pretty even without little battery powered votives in them but lit up they are sparkle-tastic!


I followed the easy directions in ReCraft to make the glitter coated cup candle holders.

I would add a note: 2 of the cups I spread the glue on a little too thick and as the glue was drying the weight of the glitter caused the glue to drip and sag down causing openings in the coat of glitter. So spread a very thin even layer of glue on the inside of the cup!
More about the craftastic book from the publisher Frances Lincoln:


ReCraft: 
How to Turn Second-Hand Stuff into Beautiful Things for Your Home, Family and Friends
by
Buttonbag Sara Duchars and Sarah Marks

"In today's thrifty times it is seems right to re-use fabrics and buttons and customize old clothes rather than buying brand new ones. The Buttonbag book is packed with instruction and ideas on how to re-use, re-cycle and re-create fantastic things, thereby transforming old into new.
There are about 40 step-by-step projects for a range of items including items for the home, clothes and accessories for all ages plus patterns, templates and basic techniques. Illustrated with photographs and hand-painted illustrations, the emphasis is on simple, easy-to-make items with a twist.
"


Thursday, November 29, 2012

How to make a Duck Tape Christmas tree shower curtain decoration

Looking for a super easy and BIG decoration? I have just the thing. Make yourself a Duck Tape Christmas tree shower curtain using holiday themed Duck Tape and a technique from the new book Crazy-Cool Duct Tape Projects by Marisa Pawelka.
Duck tape shower curtain Christmas tree Stefanie Girard
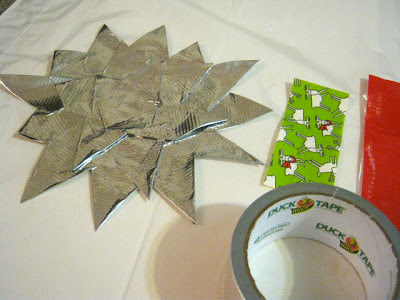
First up I hung the shower curtain and made 2 small marks as to the top and bottom of where I wanted my tree to be. Then I used the point making technique in Crazy-Cool Duct Tape Projects. I did modify it a bit by making my points a bit longer and random sizes.
 Duck tape shower curtain Christmas tree Stefanie Girard
I layered up the points starting from the outside working my way in toward the center.

Duck tape shower curtain Christmas tree Stefanie Girard
 Starting from the top I placed random strips of Duck Tape each a bit longer down the shower curtain.
Duck tape shower curtain Christmas tree Stefanie Girard
 I didn't try to keep them perfectly straight. I angled them slightly. If you are like me and like working with Duck Tape you are in luck there are 2 chances to win two prize packs full of Duck Tape, scissors and books over at Craft Gossip and Craftside.


Tuesday, November 20, 2012

How to make a Thanksgiving place setting

This Thanksgiving place setting was inspired by my almost complete lack of fall colored home decor. I was flipping through the new book Super-cute Felt and the squirrel coaster just screamed cute (go figure!) and perfect for Thanksgiving. I have a "new" old vintage Formica table and I didn't want to cover it with a table cloth so placemats needed to be made. One of my only Thanksgiving decorations is my recycled wool felted sweater turkey you see in the background.

 
So first up I traced the super cute squirrel in the pattern section of Super-cute Felt. Cut out the pattern pieces and then cut 2 of each squirrel and 2 mirror images from a fuzzy felt.

Then I glued each pair together with Tacky Glue leaving the bottom area free of glue so I could put a weight in the bottom. I ended up using 2 floral marbles. For the acorns I cut one acorn body and 2 lids. I glued them together sandwiching the bottom between the lids.

To make the pumpkin placemats I grabbed a large piece of tracing paper and one of my plates to sketch out the size of the pumpkin so it would look nice with the size of my plates.

 After I sketched the pumpkin out on the paper I cut it out and then pinned the pattern to the felt.

After I cut out the pumpkin I used a Sharpie to draw in the inner lines and the parameter. I also added a green stem. Pretty darn easy and fast!

More about  Super-cute Felt from Cico Books:
 Super-cute Felt
by
 Laura Howard

"With 35 simple yet striking projects, Super-cute Felting is a must-have book for anyone with an appreciation of adorable, hand-crafted objects. Start with the 'Accessories' chapter, packed with pretty brooches, necklaces and scarves to keep you warm and snug - try the cute kitty purse that is sure to delight any little girl. 'Gifts' is next, with plenty of inspirational ideas, such as the fruity pincushion that any keen crafter will use again and again. In 'Homewares', you will find coasters, tea cosies and hot water bottle covers, all with a touch of vintage glamour. Finally, 'Celebrations' has unique decorating ideas for all the holidays, including Christmas, Halloween and Easter. There are projects for all skill levels, so you don't have to be an old hand in order to create something really special. Every design comes complete with clear step-by-step instructions and illustrations to guide you through each step. And at the back is a helpful techniques section explaining all the stitches and skills required, plus tips and tricks to make your creations really stand out."

Wednesday, November 14, 2012

Thanksgiving "Be Thankful" banner

I am most assuredly on the banner bandwagon. Here is my latest creation. It is made from scraps of fall colored felt. Feel free to download the letter template that spells out "Be Thankful" and make one yourself!

For the triangle pennants I folded a piece of felt in half lengthwise and cut it from the bottom fold point to the outside top corner.
Enlarge the letters to be about 6.5 inches.
Trace letters and cut them out of contrasting felt.
I used Tacky Glue to stick them on the pennants.

Sunday, November 11, 2012

Toy soldier army men Christmas tree


In honor of Veterans Day I thought it would be appropriate to share my first Christmas tree of 2012. I scored these super sized army men at the 99 cents only store and I thought them being green and all they would make a great Christmas tree. I've made a lot of things with the standard size army men but this is my first with these big ones. All I did was stack a few cake plates and a candle stick and arrange them on each level.

Thanks again to all who've served!

Thursday, November 8, 2012

Altered book page silhouette inspired by the new book Journal It!

The new book Journal It! Perspectives in Creative Journaling by Jenny Doh is so filled with inspiration I just had a blast flipping through and getting excited about making something. This page from Journal It! is all about creating a reverse silhouette but I wanted to do a little work in one of my altered books so I took the idea of a large silhouette and simply did it more on the traditional style but with a similar cool glitter pink print paper.
 Here is my final page with my pink glitter silhouette.
 First I took down a photo of me that just happened to look a lot like the one in Journal It!. I imagine most of us sported little pig tails at one point or another...right?
 I traced the photo and then scanned in the tracing.
I enlarged it as big as I could and printed it out. Then cut out the large outline. I then traced the outline on the backside of the pink glitter paper (I flipped over the outline too).
Then I cut out the pink glitter paper and found a page in the book I was altering that I thought looked good and the writing worked. I have to say I love the large scale of the silhouette, they tend to be little.

If you like experimenting with different styles in your journaling, mixed-media, or altered books I bet you will love:

 Journal It! Perspectives in Creative Journaling
by
Jenny Doh

More about the book from the publisher Lark Crafts:

"Book arts, journaling, and collage come together in Journal It!, where 19 mixed-media artists showcase their signature techniques, tips, and creativity boosters. The featured work ranges from lettering expert Jill K. Berry's beautifully calligraphied travel journals to Jeannette Sclar's whimsical gardening books, and the techniques include everything from toner-based transfer to stitching with fabric and paper. With over 200 inspirational photos to guide them, even beginners can create works of art right from the start."

Thursday, October 18, 2012

How to make a recycled book page coffin Halloween garland

I find reading about other crafters so inspiring and that is just what the pages of are filled with Craft Activism: People , Ideas, and Projects from the New Community of Handmade and How You Can Join In. The photos and stories drove me to....cut....and this being Halloween season.....I thought my plain white string of lights needed something from under my knife.
 That something turned out to be little paper coffins cut from the pages of an old book and stamped with all sorts of Halloween themed images.
 I simply attached them to the string of lights with tiny clothes pins. I plan on leaving these lights up and will most assuredly be adding something Christmasy to them! I scanned in one of the coffins and if you want to make some too feel free to download to use as a template.

More about the super inspiring and packed full of great ideas and patterns book from Potter Craft:
 Craft Activism: People , Ideas, and Projects from the New Community of Handmade and How You Can Join In

by
Joan Tapper, Gale Zucker and Faythe Levine

"Join the Handmade Movement!

We make to give. We make to share. We make to connect with others. Crafters all over the world are using their hands and hearts to make a statement, change the world, and build community.

Craft Activism is an inspiring celebration of this growing movement. Inside, dozens of superstars of this grassroots phenomenon share their experiences, tips, and advice on living, teaching, and promoting a more meaningful DIY lifestyle. Learn to craft for your cause, connect with other crafters, think green, organize a fair, host an online exchange, create yarn graffiti, and more. The book also includes 17 creative projects from designers who challenge you to reimagine how your craft skills can be used to make a difference. Whether you knit, sew, crochet, or collage—and even if you’re not sure where to begin—this book is your guide to the incredible power of handmade.
"

Monday, October 8, 2012

How to make a maple leaf rubber stamp from an eraser

The book Making an Impression: Designing & Creating Artful Stamps is packed full of great ideas, designs and projects that feature the stamps you make. My favorite is the idea for stamping on vintage gum labels of which I happen to have a stash. Go figure. I recently got out some of my fall cookie cutters which included a maple leaf and I thought that a maple leaf image would make a cute rubber stamp.

 So I downloaded an image and sized it.

 Then I cut the image out of the paper. To transfer the image onto the eraser I used a silver Sharpie as my eraser is black.
 I just held the image over the eraser and drew out from the paper onto the eraser.
I trimmed the eraser down to a smaller square around the maple leaf.
Then I simply cut along the shape always working from the inside drawing my cut lines out toward the edge.
Then I cut the eraser depth off of the outside area.

To stamp my images I used a red Brush tip Sharpie. Worked like a charm to give me a vibrant impression that matched the red of the gum labels.


More about the book from the publisher Lark Crafts:
  Making an Impression: Designing & Creating Artful Stamps
by
Geninne Zlatkis

"Popular illustrator and stamper Geninne Zlatkis has a passion for nature and color that distinguishes her work. These 20 beautiful projects--including cards, an embellished journal and tote, and decorative wall pieces--provide the keys to Geninne's creative process and image-making process. In addition to technique-specific primers with step-by-step photos of the essentials, Making an Impression includes 50 motifs showcasing Geninne's signature designs that crafters can copy and use for image transfers, stamp designs, and collages.

Geninne Zlatkis is an illustrator (etsy.com/shop/Geninne) and blogger (geninne.com). She uses a wide variety of techniques (painting, collage, writing, stamping, and more) in her whimsical work. Her illustrated prints and licensed designs have been available through Urban Outfitters, and her designs are featured on an organic cotton fabric line with Cloud 9 Fabrics and a pocket planner from Galison. Geninne's hand-carved stamped-cards project was included in Craft Hope (Lark Fall 2010). She lives outside of Mexico City in Querataro, Mexico."

Thursday, September 27, 2012

How to use home made rubber stamps to customize a Freak Flag

Yup I do! Fly my Freak Flag high....or at least have fun trying to photograph it while waving it!

I scored a Freak flag from Julia of the "Fly Your Freak Flag High!" movement at the last Maker Faire. You can see photos of others customized over at her site but here is how I stamped mine with rubber stamps I made.


 To see how to make your own rubber stamps pop on over to Craftside.

Wednesday, September 19, 2012

Crochet mini doily from the book Use Up That Yarn! by The Crochet Dude

I love little quick and easy ....oh and cute projects and that is just what these crocheted coasters featured on the cover and in Use Up That Yarn! are.
I whipped one up, well not even the whole thing, just the inside part out of some black and white variegated yarn and look what I had...a tiny doily for one of my tiny pumpkins.

Got a lot of leftover yarn from projects than Use Up That Yarn! is the book for you!

More about the book from the publisher Leisure Arts:


Use Up That Yarn!

by

Drew Emborsky

"Crochet is so relaxing! But if mountains of partial skeins and "someday" yarns are causing calamity in your closets, it can be difficult to decide what to make next. With Drew Emborsky's quick and easy stash busters, you can clean up the clutter! The Crochet Dude(R) presents 13 practical projects that are fantastically fast at shrinking a stash. Set the table with crocheted coasters, a table runner, or decorative bowls. Use up that yarn to crochet a coffee cup sleeve or tea cozy. For outdoor wear, get toasty in a hat-and-scarf set. These speedy designs will get your yarn collection under control, restoring serenity to your crochet time--and your closets!"

Wednesday, September 12, 2012

How to make a recycled champagne cork acorn

I tend to save champagne and wine corks. Don't a lot of us? Well, now that it's fall, not that you would know it by the 100 degree weather, it's time to start the fall crafting (even if it is in the air conditioning). An that is just what I did.
I cut the top half off the champagne cork's roundish part. Then I carved it back to having a rounded edge. The bottom half I carved down to a rounded pointy tip like an acorn. Then I cut the line where the top half and bottom of the acorn meet a bit more deep.

All then that was left to do was a bit of smoothing of the cut marks and I did that with my Dremel.Oh and glue a tiny bit of a stick from the yard onto the top.

Sunday, August 26, 2012

Halloween bead and button spider from the book Artful Halloween

Have you started your Halloween crafting? Well I just did with the super inspirational book Artful Halloween: 31 Frightfully Elegant Projects.
 I have seen spiders made from beads before but I love how Susan mixed it up and used a button for the spider body. Using the easy to follow tutorial in Artful Halloween: 31 Frightfully Elegant Projects I whipped up a trio of spiders that looked great on my black sand zen garden (or inspiration word of the day tray).
I tried a lighter weight gauge wire and different beads so this project is super flexible. I bet probably whatever you have in your stash will work great! I can't wait to make more of the projects in Artful Halloween over the next few weeks to dress up ye old casa for Halloween.

More about the book from the publisher Lark Crafts:
Artful Halloween: 31 Frightfully Elegant Projects

by
 Susan Wasinger

"These 30+ costume, pumpkin, and home-decorating ideas are not just beautiful--they are scary beautiful. From unique pumpkin decorations to a “blood”-splashed dinner-party centerpiece to a Yard Specter made from two poles, a string of lights, and torn, draped fabric, these creepy but stylish Halloween projects will give your home a spooky, sophisticated look . . . with gothic flair!

Susan Wasinger designs houses, products, books, and magazines. Her work has been featured in Metropolitan Home, Stitch, Natural Home, and Piecework magazines, as well as on HGTV. She is the author of several books, including The Feisty  Stitcher (Lark, 2010). She  lives in Boulder, CO."

Tuesday, June 26, 2012

Scrap wood and recycled furniture cabinet

I used to make lots of furniture back in my Industrial Design days but hadn't in a long time. But with my crazy shoe phase I was in need of a cabinet/shelf to put the collection. I will admit to looking at the almighty Ikea but the space I had available was a very small specific size and nothing pre-made was going to work. So what's a girl to do? Why make it her d*mn self! So of to the scrap bin! (along with one of the panels from a 3 panel screen I had in storage that I currently didn't have space for. This is the outcome. I attached a bit of tracing paper to the inside of the screen to keep the dust out. Fits perfectly and works great!

If you too like to make furniture out of scraps and stuff check out this awesome new book simply packed with great designs and tutorials!

PlyDesign: 73 Distinctive DIY Projects in Plywood (and other sheet goods)
by
Philip Schmidt

From the publisher Story Publishing:
"PlyDesign presents 73 ideas for sleek, smart home furnishings that you can make from off-the-shelf sheet materials using only basic hand and power tools. With designs contributed by more than 50 creative builders across North America, the projects include tables, stools, workstations, benches, laptop stands, shelves, art panels, organizers, headboards, doghouses, dollhouses, and more. A photo of each finished project is accompanied by a list of needed tools and materials, cutting and assembly diagrams, and clear step-by-step instructions."

Tuesday, June 12, 2012

Creating with inspiration from the book The Collage Workbook

I love creating things that take a minute to figure out. Today I stuck with one of my favorite "slightly off" themes and used a bit of inspiration from the book The Collage Workbook: How to Get Started and Stay Inspired to create my latest mix-media altered book page. If you know your Roman numerals and police codes you will get it. If you scroll down I will tell you if you don't know these two topics.
 Have you figured it out????
OK I'll tell you. the roman numerals are 5150 which is the police code for 72 hour psychiatric hold (AKA-crazy!)

As you can see I have used this as a cross stitch and as the prompt in The Collage Workbook: How to Get Started and Stay Inspired suggests using numbers in creating, what better number...or is it letters really? Letters representing numbers? Another layer in the mystery.....

All I did was go through magazines and cut the letters out "ransom" style and glue them on a page that also contains an interesting idea all be it a little "off" shall I say and maybe even appropriate for the number designation????? Hmmmmmm.

If you too like creative prompts to help guide you I bet you will like The Collage Workbook: How to Get Started and Stay Inspired as much as I do!
More about the book from the publisher Lark Crafts:
The Collage Workbook: How to Get Started and Stay Inspired
by
Randel Plowman

"Both a popular hobby and a recognized art form, collage encompasses a wide range of creative styles and techniques--explored here by the creator of the popular A Collage a Day blog. Offering step-by-step instruction, visual inspiration, and even a library of copyright-free images, this hands-on guide covers all the necessary materials, tools, and know-how, from adding color and transferring images, to décollage (tearing away layers). And to spark the reader's imagination, there are 52 creativity prompts, such as a collage using the letters of a single word.

Randel Plowman is the founder of the popular blog A Collage A Day (http://acollageaday.blogspot.com). His art has been exhibited in solo and juried exhibitions throughout the United States and abroad; cited in The New York Times and USA Today; featured in How Design, Artist Magazine, and Somerset Studio; and graced the covers of numerous books. Randel resides in Madison, Wisconsin."

Tuesday, June 5, 2012

How to transform a plain tank top for 4th of July with Simply Spray fabric paint

This could not be any easier!
I rarely wear white because I am always making something and some part of it inevitably gets on me. So when I have a white garment I see it as a canvas and what goes better on a canvas then paint!

Like last week's post I am in full on 4th of July decorating mode so I thought I'd try painting a tie die style flag on this tank top with a bit of red and blue Simply Spray fabric paint. I just free formed it! I love how the wrinkles add to the tie die effect.

Wednesday, May 30, 2012

How to make a decoupaged 4th of July wreath

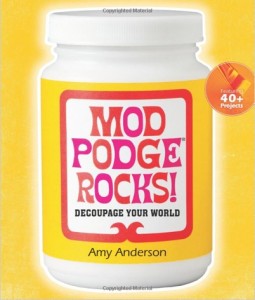
 I'm having so much fun making new decorations for each holiday and this is my latest creation inspired by the book  Mod Podge Rocks!: Decoupage Your World I made for 4th of July.

This wreath was one I originally covered in tiny pine cones and it had lost a few so I decided to recycle it into a new one for summer.


It didn't take long to peal off all the pine cones. I went to the fabric stash and gathered up some red, white and blue fabrics. This wreath project featured in Mod Podge Rocks! was my inspiration.
I liked how cheery it was and the wrapping and decoupage seemed like it would work great with fabric.

I pinned my fabric strips in place and then spread on the Mod Podge to the front and sides. The pins had the added benefit of keeping the wreath elevated. Talk about a crafting twofer!

After the Mod Podge was dry on the 3 sides I spread it on the back taking the pins out as I went and smoothing down the fabric ends.

All that was left to do was glue a few toy army men on and wrap the wreath with a bit of star spangled wire.

If customizing your world by decoupaging with Mod Podge is your thing you will truly be inspired by the book:

 Mod Podge Rocks!: Decoupage Your World
by
Amy Anderson

More about the book from Lark:
"Since 1967, crafters have entrusted their most treasured creations to Mod Podge--the number one, all-in-one glue, sealer, and finish product that's water-based for easy cleanup and totally non-toxic. The popularity of Mod Podge continues to grow, as does its product lineup that now includes Sparkle, Outdoor, Dimensional Magic, and Fabric formulas.

Mod Podge Rocks! features over 40 simple, inexpensive decoupage projects that showcase the versatility of this celebrated product.  Contemporary, fun, and welcoming--just like author Amy Anderson's popular Mod Podge Rocks! website-the book includes everything from home accessories and holiday décor to wearables and jewelry.  Joining Amy herself as guest project designers are some of the hottest names in crafting, such as Cathie Filian and Candie Cooper. A basic section outlines the simple techniques, and each project features beauty shots, easy-to-follow instructions, and how-to photos."

Blog Widget by LinkWithin