To kick off the new year of 2016 I thought I'd design an adult coloring page that will be an inspiration each new day as unique and full of possibilities. I found the quote, "365 New Days 365 Choices" that fits the bill. If the font looks familiar it's used in the Power Puff girl logo.
I used a combination of BIC markers, Chameleon Markers, Spectrum Noir and Tombow Markers.
Feel free to download and if you do,
leave a comment with a link to your finished page or tag me on Instagram
@StefanieLGirard
Monday, December 28, 2015
Wednesday, December 23, 2015
Last minute recycled office supply Christmas decorations
I love office and school supplies. I collect vintage supplies and along with new supplies they can be recycled into new and fun decorations.
I created the scissor snowflake simply by wiring the finger holes together. The hinged ruler was the easiest by simply opening it partially to create the star. The star on the right was a bit of a funny challenge idea.
I was given a stash of hanging file folder with the challenge, "maybe you can make something with all of these?"
I spotted the traditional stick star craft project in a magazine and I thought about my stash of hanging file folders.
The stars were easy to make.
I simply removed the metal hanger from the paper folder and overlapped them into the star shape.
I secured the points with a bit of wire.
I glued vintage typewriter keys onto the tips that spelled out PEACE for a final decorative touch.
Happy Holidays everyone!
Monday, December 14, 2015
How to make a Milk and Cookies Table for Santa with 3 sticks and a Walnut Hollow Country Round
I have been wanting to make this project for a while but had to wait until we had a wind storm that brought down just the right branch. Well, that happen and so now I can share with you my Milk and Cookies table for Santa project.
It works great too if you think Santa prefers an adult beverage and mixed nuts :)
Materials and Tools
3 sticks/branches about 1 inch in diameter
Walnut Hollow Country Round Extra Large
Twine
Hot Glue
Cut the sticks to about 23 inches.
Hold the sticks together and tie them together at the center of the bunch of sticks.
Splay the sticks out in a twisting motion and place the wood round on the sticks. At this point adjust the sticks so that the table is perfectly level.
Continue wrapping the sticks with twine.
Add hot glue in the middle of the three sticks and glue the ends of the twine into the center.
This will lock the sticks in place and make a nice band of twine on the table.
I did want to share the ugly sweater cookies I leave out for Santa. I imprinted a reindeer on the cookie doe.
Some cookies I filled in the shape with green sugar and some I rubbed the green sugar into the imprint to form an outline.
Tuesday, December 8, 2015
A sketch book cut into a star shape is the perfect topper for a stack of green books Christmas tree
My books are not only a wealth of information and inspiration they are a creative material as well. I gathered up all my green ones to make this Christmas tree. I thought it would be fun to cut a sketch book into a star shape to top it off (I loved my letter cutting project that spelled out a word).
This is super easy to do with a Dremel Moto-Saw.
I printed out a star and wrapped it around the book and outlined the shape on the book.
I rough cut the book down to a small area around the star. I did this as it is easier to cut into each "v" of the star from the out side straight in.
This is super easy to do with a Dremel Moto-Saw.
I printed out a star and wrapped it around the book and outlined the shape on the book.
I rough cut the book down to a small area around the star. I did this as it is easier to cut into each "v" of the star from the out side straight in.
I plan on cutting more books into fun shapes in the new year. Try it!
Friday, December 4, 2015
How to make a Vintage Hankie and chicken wire Christmas tree
Today's "stash craft" features my collection of vintage hankies displayed on a cone of chicken wire to form a Christmas tree. It was so easy to make and will be easy to take down.
Materials and Tools
M-D Hobby and Craft Chicken Wire
Vintage Hankies or these reproduction vintage style hankies
or these vintage look hankies
binder clips
Tree topper- I used a dove with a clip base
I wrapped the chicken wire into a cone shape and secured it with binder clips. The cut ends I bent back onto the overlapped areas of chicken wire to further secure.
Then all that is left to do is gather each hankie by the center and poke it into the spaces starting at the bottom and working up to the top point.
I clipped a dove onto the top of the Christmas tree with a hankie covering all the chicken wire.
When Christmas is over you can simply disassemble and use your vintage hankies for another project.
Thursday, December 3, 2015
Raise A Little Cane Christmas Adult coloring page
Today I have 2 free Christmas themed adult coloring pages for you. This first one that features the quote, "Raise A Little Cane" and the second one, "Don't Get Your Tinsel in a Tangle" can be downloaded over at Chameleon markers along with a whole bunch of other quotes.
Pop on over to see the coloring video and download the page.
Pop on over to Chameleon Markers for this Free Download of "Don't Get Your Tinsel in a Tangle" adult coloring page and while you are there check out my other quote coloring pages.
Feel free to download and if you do,
leave a comment with a link to your finished page or tag me on Instagram
@StefanieLGirard
Happy Holiday Coloring!
Pop on over to see the coloring video and download the page.
Pop on over to Chameleon Markers for this Free Download of "Don't Get Your Tinsel in a Tangle" adult coloring page and while you are there check out my other quote coloring pages.
Here they are the way I colored them.
Happy Holiday Coloring!
Monday, November 30, 2015
24 Cups of Tea Christmas Countdown Calendar
I have been thinking about my Christmas decorations for quite some time but I can finally enjoy them fully now that Thanksgiving decorations are packed away. My favorite decoration this year being Christmas countdown calendars. This one is made with my collection of tea cups. Each one is filled with tea. I think it's important to remember to take time to reflect and relax each day during this busy time of year.
Materials and tools:
24 tea cups
24 tea bags
peg board and hooks
paint
faux wood graining tool
Christmas paper
Computer and printer
Sticker paper
Christmas lights
I scored a piece of peg board at Eco-Set. A company here in Los Angeles that recycles set pieces to artists and students.
I gave it a faux wood finish with Americana Decor Chalky Finish by DecoArt with a faux wood graining tool.
I printed out the numbers on sticker paper and stuck them on Christmas scrapbook paper that I cut into circles with a Sizzix Big Shot Plus.
I taped the tea bag to the back of the circle of paper and placed them in each tea cup.
It was fun to arrange all the tea cups and I think it makes a nice was to display them.

I hope you have a wonderful pre-Christmas season and enjoy moments of crafting and relaxing.
Materials and tools:
24 tea cups
24 tea bags
peg board and hooks
paint
faux wood graining tool
Christmas paper
Computer and printer
Sticker paper
Christmas lights
I scored a piece of peg board at Eco-Set. A company here in Los Angeles that recycles set pieces to artists and students.
I gave it a faux wood finish with Americana Decor Chalky Finish by DecoArt with a faux wood graining tool.
I printed out the numbers on sticker paper and stuck them on Christmas scrapbook paper that I cut into circles with a Sizzix Big Shot Plus.
I taped the tea bag to the back of the circle of paper and placed them in each tea cup.
It was fun to arrange all the tea cups and I think it makes a nice was to display them.

I hope you have a wonderful pre-Christmas season and enjoy moments of crafting and relaxing.
Wednesday, November 25, 2015
Happy Thanksgiving paper leather squirrel
Squirrels are so darn cute! I just got the Sizzix squirrel die and some of their new paper leather sheets perfect for using with it as the brown tone was perfect and the flexibility would lend itself to a bit of sculpting.
I die cut 2 squirrels and glued them together at the head and tail ONLY. After the glue dried I could separate the hands and feet a bit to get the squirrel to stand and hold an acorn between its paws.
To give the squirrel a bit more dimension I colored it a bit with Tombow recycled pencils.
Happy Thanksgiving!
Wednesday, November 18, 2015
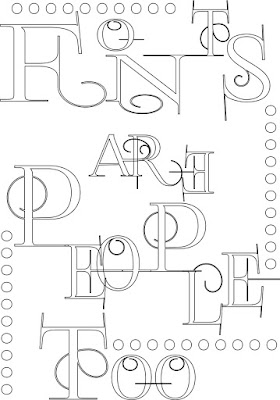
"Fonts Are People Too" quote adult coloring page
Today's quote come from a post title featured at the company blog for Hawk Media. I simply thought it was funny so I did this coloring page. One of my favorite things to do is flip letters, especially at the end of words.
I used a combination of BIC markers, Chameleon Markers and Tombow Markers.
Feel free to download and if you do,
leave a comment with a link to your finished page or tag me on Instagram
@StefanieLGirard
I used a combination of BIC markers, Chameleon Markers and Tombow Markers.
Thursday, November 5, 2015
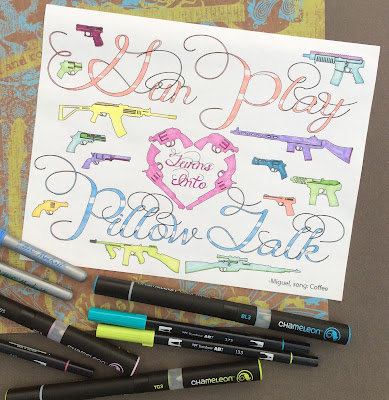
"Gun Play Turns into Pillow Talk" Quote Adult Coloring Page
Song lyrics are one of the best sources for quotes and today's adult coloring page is a lyric from the Miguel song, "Coffee". The line that comes before this quote is "wordplay" and after, "...coffee in the morning". There are two versions of this song with different lyrics (one is less "PG" than the other).
I used a combination of BIC markers, Chameleon Markers and Tombow Markers.
Feel free to download and if you do,
leave a comment with a link to your finished page or tag me on Instagram
@StefanieLGirard
I used a combination of BIC markers, Chameleon Markers and Tombow Markers.
Monday, October 26, 2015
Giant eyeball Halloween decoration
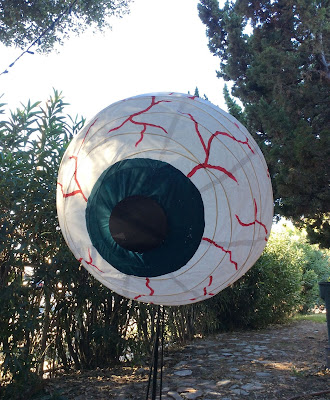
Today's Halloween decoration was a total surprise project. I was out for my morning walk and one of my neighbors had put this lamp out by the side of the road in the "free zone" and I instantly saw its possibility to be turned into a giant eyeball with just a bit of paint and a circle of black cardboard.
That's really all there is to this. I freehanded a blue circle of paint and the red bloodshot lines. I used a plate as a template to cut the circle. The kids are loving it as they walk to school :)
This is the latest in my recycled eyeball series. I have made eyeballs from yoga balls, bowling balls, ping pong balls, paper weights, and have needle felted and crocheted them. I see a happy Halloween in your future!
Thursday, October 22, 2015
Halloween decoration: Pumpkin jar filled with Pepperidge Farm Goldfish
This falls under the so quick and easy you won't believe it category. Hey wait that should be a hashtag. I will be using that one!
Step 1: Fill clear pumpkin shape container with Pepperidge Farm Goldfish.
I did however put all my jack-o-lantern bowls, candle holders, salt and paper shakers and a mug with it as a collection seems to have formed. Hmmmmm how did that happen?
Step 1: Fill clear pumpkin shape container with Pepperidge Farm Goldfish.
I did however put all my jack-o-lantern bowls, candle holders, salt and paper shakers and a mug with it as a collection seems to have formed. Hmmmmm how did that happen?
Tuesday, October 20, 2015
How to paint zig zag and wavy stripes with quotes on planter pots
I am in love with quotes! Yes indeed I am. I have designed tons of adult coloring pages based on quotes and I have quotes all over my house and yard. My latest quote embellished items are these giant 22 inch Fiskars planters.
They were fun and easy to make.
I used Frog Tape in the chevron pattern and the scalloped pattern.
I simply ran 2 strips around the top edge to form a stripe. To prevent spray paint getting on the pot below the stripe I used some newspaper sale flyers.
I used the box the pots came in as a stand while painting them.
Now that I had a nice scallop and chevron stripe on each of the pots it was time to embellish and write the quotes.
I used 2 Krylon paint pens. 1 in gold and one in black.
The 2 quotes I wrote were:
"Don't go through like, grow through life."
and
"We never really grow up. We only learn how to act in public."
I simply hand lettered around the pot adding some swirls as well for fun.
I highly recommend dressing up flower pots and planters with quotes. It is just another thing to make you smile around your house.
Wednesday, October 14, 2015
How to make a see-through skull shirt with a Sizzix die cut
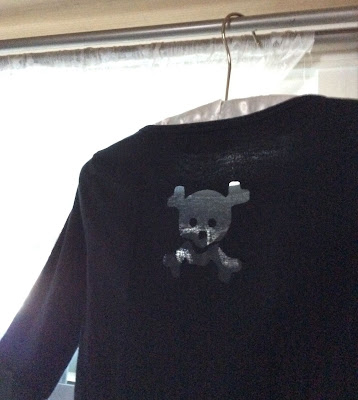
I haven't done too much with clothing lately but today's post is my latest favorite thing to do with clothing- die cutting it! With my new Sizzix Big Shot. I thought it would be fun to do a skull on the back of a black shirt for Halloween.
I found a plain black shirt in the stash and gathered up:
white tulle
Heat n Bond
press cloth
Inner ironing board with scrap press cloth
Sizzix skull die
The first step is to turn the shirt inside out and iron on a square of Heat n Bond to the area you are going to die cut.
Next die cut your shape. The Sizzix Big Shot makes all the difference as you have tons of space for all the extra fabric of the shirt.
Then Iron on the tulle. Be sure to use a press cloth under the shirt surface and on top so you don't get adhesive on the front side of the shirt or your iron.
Then flip the shirt right side out and peal off the paper backing on the die cut eyes and nose and iron them onto the tulle. Be sure to use the press cloths on this step too!
Here's another photo you can see how translucent the shirt die cut is with the window light coming through.
Monday, October 12, 2015
I'm A Good Witch Most of the Time - Adult coloring page
I thought I'd design a coloring page for Halloween and so I went poking around for a good quote and "I'm a good witch most of the time" jumped out as the clear winner. If it calls to you too feel free to download and color away my fellow good most of the time witches!
I used a combination of BIC markers and Chameleon Markers.
Leave a comment with a link to your finished page or tag me on Instagram @StefanieLGirard
I would love to see how yours turns out.
I used a combination of BIC markers and Chameleon Markers.
Leave a comment with a link to your finished page or tag me on Instagram @StefanieLGirard
I would love to see how yours turns out.
Subscribe to:
Comments (Atom)


